In HikaShop, you will be able to manage filters for the customer products listing. Filters are only available in the Business edition of HikaShop.
Go to Display => Filters to see filters. You can find additional options for filters display in the Display tab of the configuration of HikaShop.
To display your filters, you have to make sure your module/listing has the “filters” display option set to Yes.
You can also display your filters as a module by configuring the HikaShop Filter module via the joomla module manager. In your filter module, set the id of a HikaShop category listing menu (you need to create that menu beforehand) in the menu option.
If you want to hide the filters at the top of the products listing, turn off the “filters” display option of your products listing menu item on the options page of your menu item that you can find via the Joomla menu manager when you edit the menu item.
Toolbar
Save & Close : Click this button to save the filter and return to the filters Management screen.
Save : Click this buton when you modify the filter and stay on the same screen.
Cancel : Click this button if you return to the previous screen without saving the modifications.
Help : This button enables you to turn ON/OFF the help section.
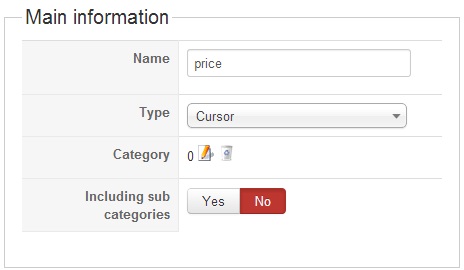
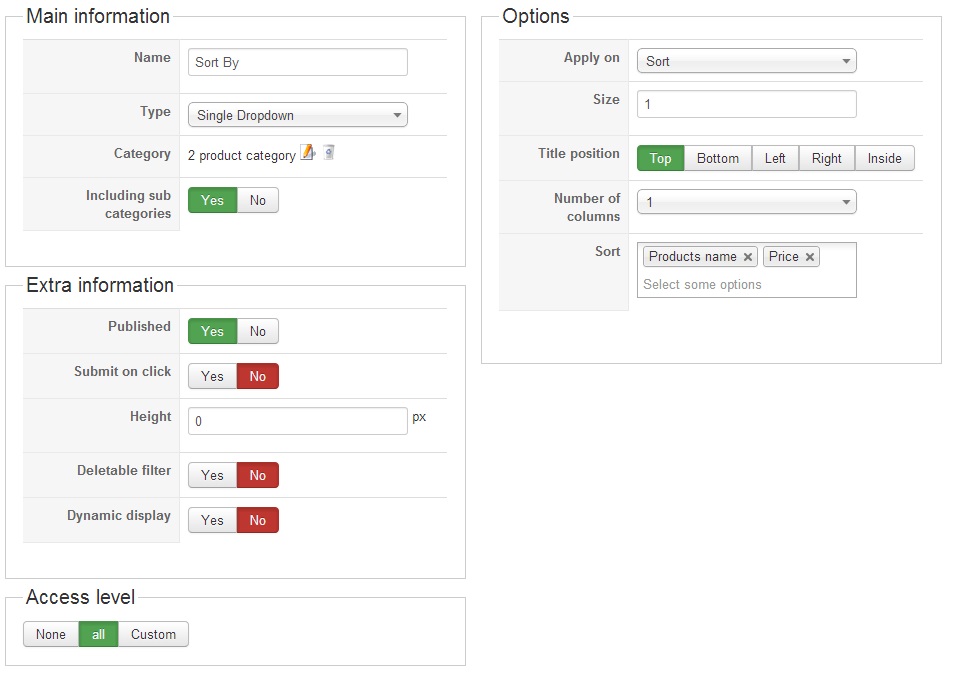
Set the main information
Name : Enter the name of your filter.
Type : Select the type of your filter. Here you can see the different types of filters available:
Category : Select the category where you want the filter to applies. If no category is selected, the filter will always be displayed on products listings.
Including sub categories : If you have sub categories inside the category you selected in the previous option, if you set this option to YES, it will allow the filter to also be displayed when displaying products in sub categories of that category.
Extra Information
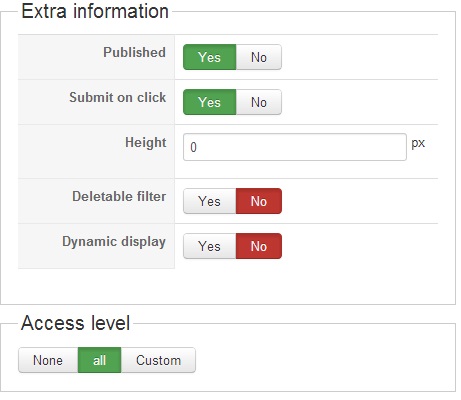
Published : If a filter is published it means that it will be used by the system.
Display limited to : You can select another filter and the corresponding values for which you would like the current filter to be displayed.
Submit on click : If you set this option to YES, you don’t need to click on the “Filter” button. The filter will be applied automatically on click.
Height : Set the height of your filter.
Deletable filter : If you set this option to YES, when a filter has been used, there is a delete icon next to it in order to cancel the filter.
Dynamic display : By setting this option to YES, it will allow you to change the options of the filters according to the previously selected filters.
Access level : You can restrict that filter from being displayed to some joomla groups of users.
Options
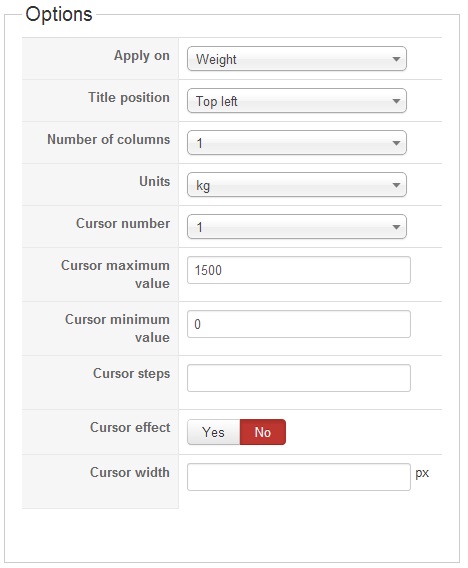
Apply on : Choose the type of information managed by your filter.
Title position : Choose the position of the title of the filter. You can place it on the top, left, right, at the bottom or inside your filter.
Number of columns : Choose the size (width) of each filter. It can be used for cursors to be more precise while setting an interval.
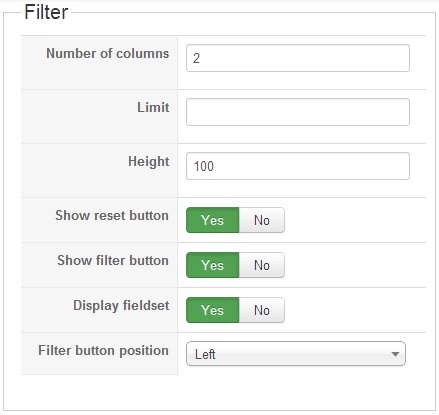
Display
Additional options are available in the Features tab of the configuration of HikaShop. These options are global options of the whole filters zone.
Number of columns : Set the number of columns for your filters.
Limit : Define the number of filters shown.
Height : Define the height of each row of filters.
Show filter button : If you set this option to No, the “Filter” button will not be visible. In that case, you should activate the option “Submit on click” on the different filters you created, otherwise the filters won’t do anything.
Show reset button : Set this option to Yes to display a reset button emptying all filters.
Display fieldset : Display or not the fieldset around the filters.
Filter button position : Set the position of the filter button, you can place it on the left or right of the filters, or next to the last field with the option “Inside”.
Detailed Possibilities
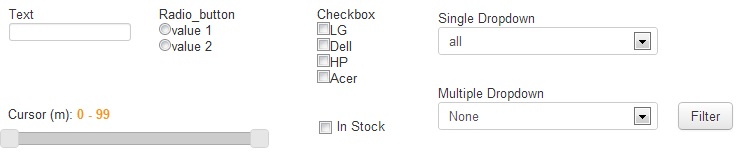
Text : If you choose this option, it will display a text field.
Apply on: Define on which field the search will be done. Note that filters on price won’t search for variants’ price.
Search Processing : Every words will distinctly search each word typed (but they both have to appear somewhere), complete expression will search for the whole expression, any word will search for each word with or without the others. Finally the search operators features allow our customers to use quotes for a complete expression search (like “red balloon”), plus for a every word search (red+balloon) and spaces for an any word search (red balloon)
Maximum length : Define a maximum length for the typed expression.
Radio Button : This filter will display radio buttons with the values you specified or specific information
Apply on: This option define on which data the filter will be executed. Changing it may display additional information.
Inline button : change the button display and put the radio button in a line
Currencies : If you selected “price” in the “apply on” option you must select a currency
Values : Here you can set the different values of your radio buttons. If the “Defined limits” is set to No, it will display theses values this way: “from X to Y” and “superior to Y” and “inferior to X”
Defined limits : This option will make the radio buttons display the exact values you specified without anything else
Categories/caracteristics : This option will be displayed iy you choose category or characteristic in the “apply on” option. It will display the different values of your characteristics or the sub-categories of the selected category
Sort : If you chose the “sort” option in “apply on”, this field will allow you to pick up the data on which the sort have to be done. Since it’s a multiselect, you can pick “price” and “weight” if you want to display “ascending price”, “ascending weight”, “descending price”, “descending weight”.
Custom Fields : allow you to pick up a custom field. You then have to add values so it will filter on these custom field.
Check box : Display check boxes. The options available for this filter type are the same as for the radio button.
Single Dropdown : This filter type display a single dropdown. The options available are the same as for the buttons except you can define a specific size.
Multiple Dropdown : This filter type display a mulitple dropdown. The options available are the same as for the Single dropdown
Cursor : This filter type will display a cursor which allow simple and quick filtering on your product data.
Apply on: Choose here on which data of product you want the cursor to be apply.
Cursor number : You can there choose how much cursor you want to display. One will make the filtering to go from 0 to the given value. Two allow a more precise selection from X to Y. Three allow from X to Y and Z to MAX (or 0 to Z) and Four allow from X to Y and Z to W.
Maximum and Minimum value: Allow you to specify a maximum and minimum value instead of 0 and the maximum automatically found.
Cursor step: if you want the cursor to go from 5 to 5, set 5 here.
Cursor effect: Display a smooth effect when clicking on a cursor
Cursor width : Define the exact width of the cursor bar.
List : Display the select information in a simple list. This filter type working the same way as the dropdown and buttons
In stock Checkbox : Display a simple checkbox. If you check this box, only in stock product will be displayed.
Example
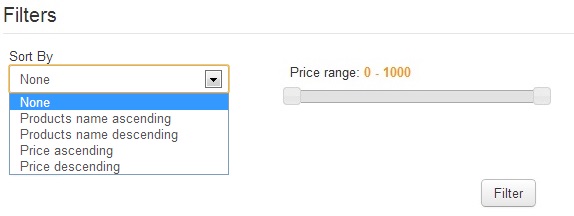
Here we have a small tutorial on how to create a filter which display a cursor of prices next to a dropdown allowing to sort by price and name.
Go in Display >> Filters, then clickon “New” button to create a new filter. Configure your first filter like this:
It will display a Jquery cursor allowing user to define a range of price for the product displayed, including discounted products. The filter will be applied on price since it’s the selected option and we set a maximum and minimum value for it. You can notice that cursor effect is activated to give a smooth scroll when you click on the cursor bar.
Second filter has to be configured this way:
It will display a sort dropdown where you’ll be able to choose between “price ascending”, “price descending”, “name ascending” and “name descending”. You can see that the sort field allow you to add as much data as you want. Two new entries will be displayed for each data.
You will see the result like this:
If you have any question about this post, don’t hesitate to leave a comment below. And don’t forget to share with your friends if you find it useful! Thanks!
We're a Digital Team from EngineTemplate with 5 content experts. Our team has 5 years exp in open source Joomla and WordPress, we make daily blogs and build useful resources for everyone who is having issues with open source while using it.