In HikaShop, you can manage all your custom fields, for the customer information, his addresses information, categories information, products information, article information and orders information.
With the address custom fields, you can personalize the information you can gather from your customers for each of their addresses.
With the user custom fields, you can personalize the information you can gather from your customers when they register while on the checkout process. For example, you can add a custom field to know their birthday, then, thanks to the integration with AcyMailing, you can send automatic emails to them based on their birthday.
With the category custom fields, it allows you to personalize the information for your categories. Your potential customers will be able to see those on the products and categories listings if you choose to display them there..
With the product custom fields, you can personalize the information for your products. Your potential customers will be able to see those on the product page. Also, with the filtering module, your customers will be able to filter your products using filters based on those custom fields.
With the item custom fields (business edition only), you can personalize the information you can gather from your customers when they order something on your store. The custom fields will appear on the products page where you will be able to ask the user information related to the product he wants to buy.
With the order custom fields (business edition only), you can personalize the information you can also gather from your customers when they order something on your store. These fields appear on the checkout in the fields view. For example, You can ask them information about the delivery or the payment or a “comments to the shop” field and this information will be displayed on the order details and/or the orders listing on the back end.
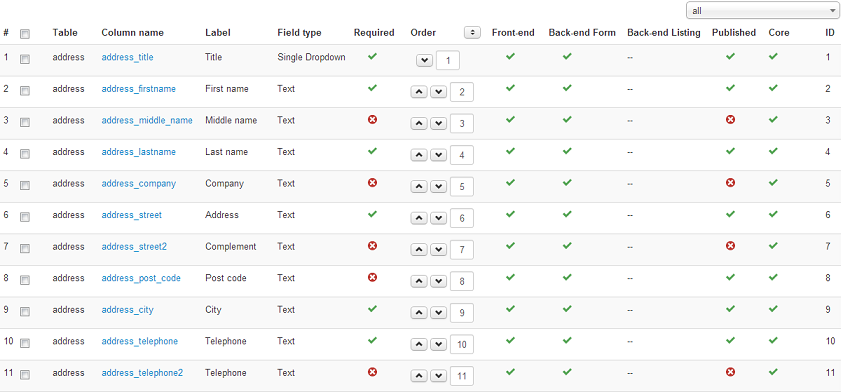
You can find the custom fields listing via the menu Display >> Custom fields in your HikaShop backend.
Listing Page Toolbar
New : Click on this button to create a new custom field. Edit : Click on this button after selecting a custom field in order to edit its information. Delete : Select one or several custom fields and click on this button if you want to completely delete them. You can’t delete core custom fields which are the custom fields there by default. You can however unpublish them. Help : This button enables you to turn ON/OFF the help section. Control panel : Click on this button to go back to the control panel using this button.
Column Headers
Checkbox : Check this box to select one or more items. To select all items, check the box in the column heading. Table : The type of custom fields. It is the name of the table where the custom field column is added. Column name : The name of the column in the table. You should limit the use of special characters for this column. Label : The label of the field. You can translate it via joomfish. Note that core custom fields should be translated via the translation file of hikashop so that everyone can benefit of the translations. In the translation file you will find them by searching for the english label which will be uppercase and spaces replaced with _. For example, you will find “Middle name” with the key MIDDLE_NAME in the translation file. Field type : The type of the custom field (as a dropdown, or as an input box or as a text area, etc). Based on that you might have additional options when editing the fields. Required : This will define whether the field needs to be filled in forms. Order : Define the position of fields on forms. Front end : If you set it to YES, address and user customer fields will be used during the checkout process to ask more information about the customer. Product custom fields will be displayed as specifications on the product page. Back end Form : If set to yes, you will be able to change this information on the back end. Back end Listing : If set to yes, the value of the field will be displayed as an additional column on listings on the back end. This only applies to user and product custom fields. Published : If a custom field is published it means that it will be used by the system, otherwise. ID : This field indicates the ID of the custom field.
Edition PageToolbar
Save : Click this button if you want to save the custom field and return to the custom fields Management screen. Apply : Apply the modifications to the custom field and stay on the same screen. Cancel : Click this button to return to the previous screen without saving the modifications. Help : This button enables you to turn ON/OFF the help section.
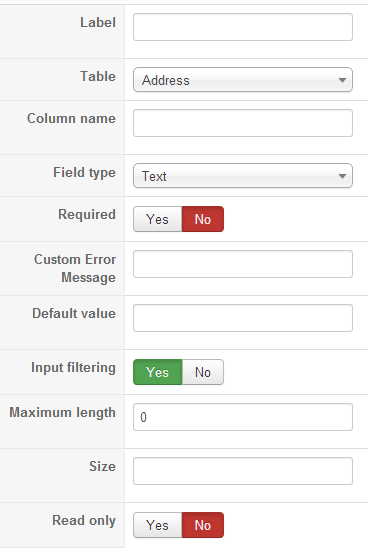
Main Information
Label : The label of the field. Note that core custom fields should be translated via the translation file of hikashop so that everyone can benefit of the translations. In the translation file, you will find them by searching for the english label which will be uppercase and spaces replaced with _. For example, you will find “Middle name” with the key MIDDLE_NAME in the translation file. Table : The type of custom fields, it’s the name of the table where the custom field column is added ( address, user, product or order). Column name : The name of the column in the table. You should avoid as much as possible special characters for the column name. Field type : Enable you to decide how you want to show your custom field (as a dropdown, or as an input box or as a text area, etc). Required : This will define whether the field needs to be filled in forms. Custom Error Message : If the user does not fill a required field, a standard message will be displayed. You can customize your error message in this field. Default value : Default value for the current field. If you change the field type, you will have to save the change before you will see the corresponding default value option. Fields below the default value option : These fields will enable you to customize further the custom field. Regular expression check : Enter here a regular expression so that if your custom field is required, the data entered by the user in the field will have to match the regular expression here. Fields below the default value option : These fields will enable you to customize further the custom field. Maximum length: Set the number of character to enter in a custom field of type text or textarea. Size: Define the number of line to display in a dropdown. Read only: Used to lock the value of a text type custom field, the customer can’t change it’s value. Attributes: you can enter here attributes that can be added to the field HTML element. So for example, for a custom field of the type “text” you could enter the text: autocomplete=”off” in order to deactivate the auto complete feature of the browser for that custom field.
Additional Information
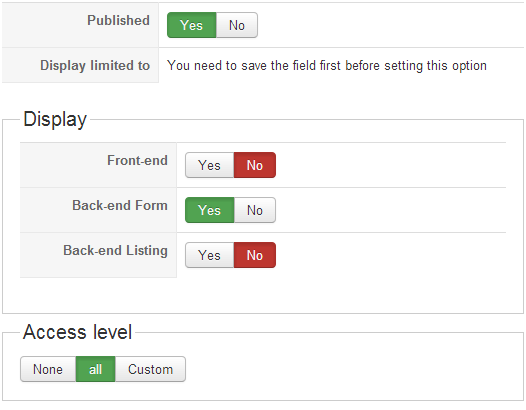
Published : If you set this option to YES, that custom field will be used by the system, otherwise, it won’t be taken into account. Display limited to : You can select here another custom field of the same table and the corresponding values for which you would like the current custom field to be displayed. Front end : If this option is set to YES, address and user customer fields will be used during the checkout process to ask more information about the customer. Product custom fields will be displayed as specifications on the product page. Back end Form : If you set this option to YES, you can change this information on the back end. Back end Listing : If you set this option to YES, the value of the field will be displayed as an additional column on listings on the back end. this only applies to user and product custom fields. Categories : For custom fields of the tables “Category”, “Product” or “Item”, you can restrict the display of the custom field to only some categories.
The preview part will display you an example of how it will be displayed on the back end and front end forms. Don’t forget to save the custom field in order to see your changes applied to the preview.
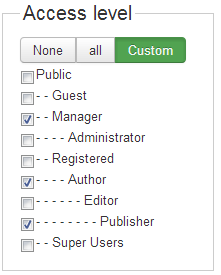
Access level : You can restrict that custom field from being displayed to some joomla groups of users. This option is only available in the Business edition of HikaShop.
Detailed Possibilities
Categories : This option allow you to specify a category for this field. Depending of the table, the custom field will be displayed for each product of this category and will be editable (for item) or not (product case). Columns : If you choose the type “Text area”, you can define the number or columns. Input Filtering : If you have a custom field of type “link”, “text”, “text area” or “WYSIWYG”, enabling this option will filter the text entered and avoid XSS vulnerabilities. Values : For custom fields with the type “checkbox”, “dropdown”, “radio buttons”, you can define specific values. You can add and remove values for those custom fields. If you left a value empty, it will be removed on saving. Format : This option allow you to define a specific format for your dates (like %Y-%m-%d) Allow : For dates again, give the possibility to select only past or future dates.
If you have any question about this post, don’t hesitate to leave a comment below. And don’t forget to share with your friends if you find it useful! Thanks!
We're a Digital Team from EngineTemplate with 5 content experts. Our team has 5 years exp in open source Joomla and WordPress, we make daily blogs and build useful resources for everyone who is having issues with open source while using it.