You added custom fields to your Joomla articles, filled them in, and now they all show up as one plain list under the title. That is fine for a quick test, but a real site needs the author name in the byline, a price badge next to the intro image or a rating box in the sidebar of the article. This tutorial shows how to place each Joomla custom field exactly where you want it with a template override, in Joomla 5 and Joomla 6, without touching core files.
We will use a simple book review example with three article fields: book-author (Text), isbn (Text) and rating (List). The same technique works for any field type and any template, whether it is Cassiopeia, a Helix-based template or one of the Engine Templates Joomla designs.
How Joomla renders custom fields
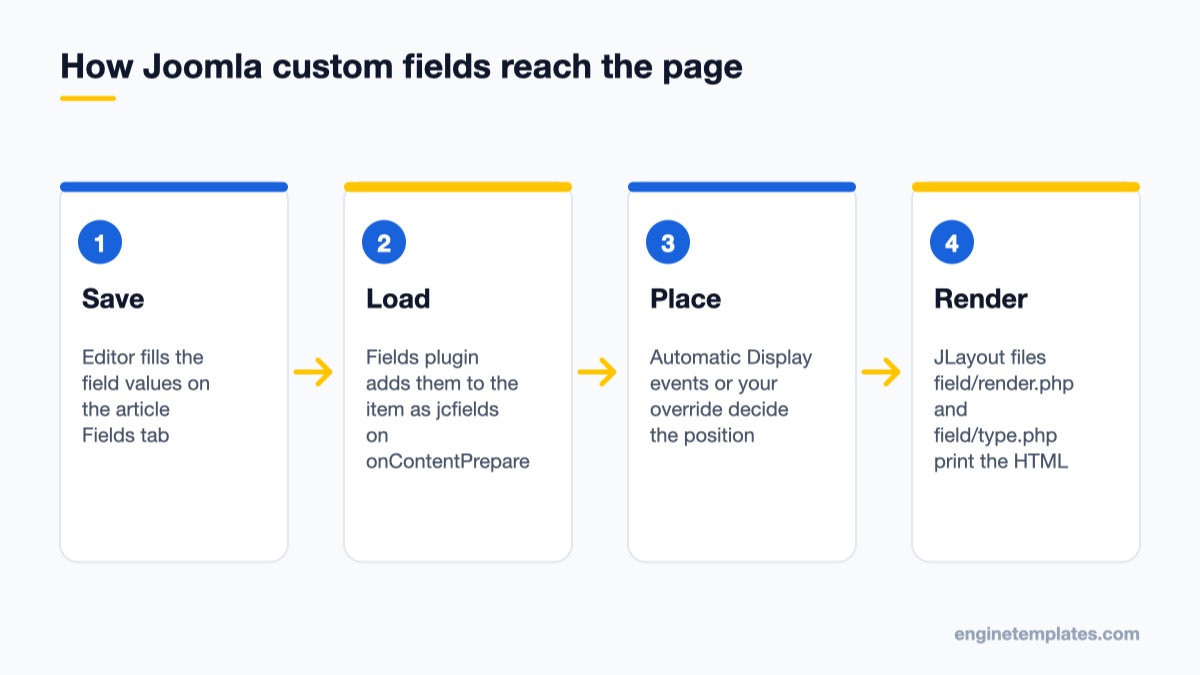
The Fields plugin loads values into jcfields, then the article layout or an automatic event prints them.
Before writing an override it helps to know where the field output comes from. When Joomla loads an article, the Fields system plugin listens to the onContentPrepare event, reads the fields that belong to the article’s context (com_content.article) and attaches them to the item as an array called jcfields. Every entry in that array is an object with properties such as id, name, label, value, rawvalue, type and context.
Each field also has an Automatic Display option. Depending on that option, Joomla prints the field through one of the article events:
After Title – output goes into $this->item->event->afterDisplayTitle.
Before Display Content – output goes into beforeDisplayContent, just above the article text.
After Display Content – output goes into afterDisplayContent, below the text.
Do not automatically display – nothing is printed, but the field is still loaded into jcfields.
That last point is the key to this whole tutorial. If you switch a field to “Do not automatically display”, its data stays available in the layout, so your template override can print it wherever it likes. The rendering itself happens in three layers of JLayout files: fields/render.php wraps a group of fields, field/render.php prints one field with its label, and field/<type>.php (for example field/text.php) formats the value. All three can be overridden in your template.
Three ways to place a field (and when to use each)
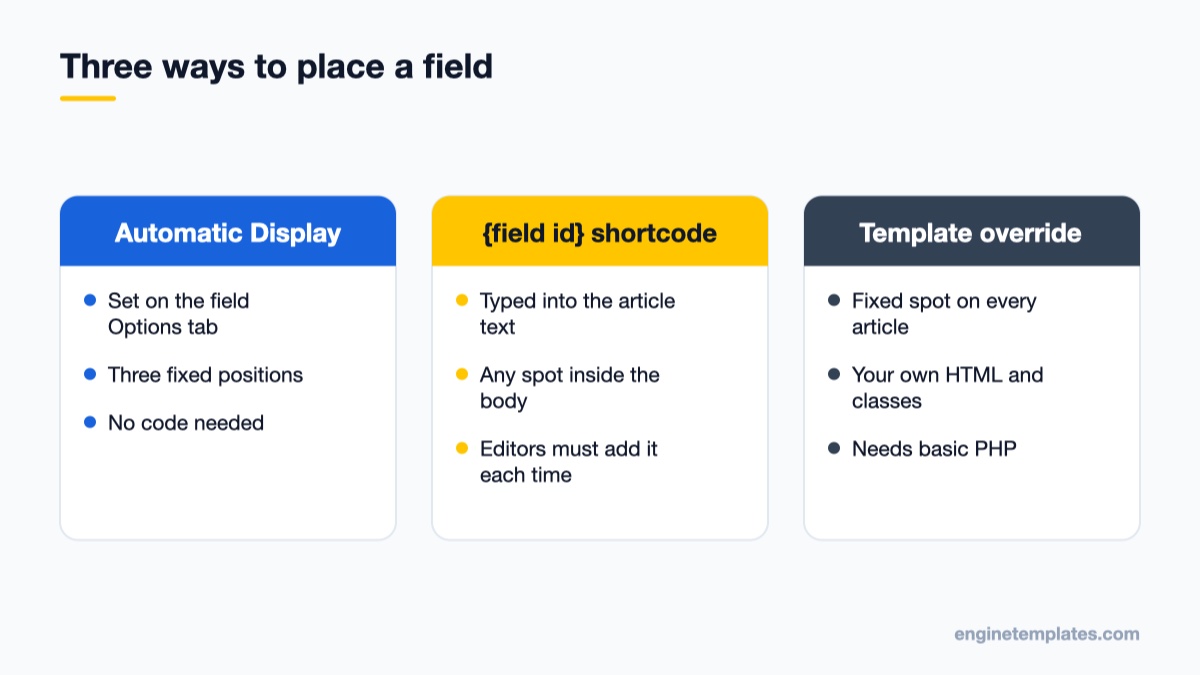
Automatic Display is quickest, the shortcode suits one-off cases, an override fixes the position site-wide.
Joomla gives you three options, and a template override is not always the right one.
1. Automatic Display
The quickest route. Open Content → Fields, edit a field and go to the Options tab. Under the render options you can set Automatic Display and choose a Layout. Use this when the three fixed positions (after title, before content, after content) are good enough.
2. The {field} shortcode in the article text
The Content – Fields plugin (enabled by default) replaces {field 3} in the article body with field number 3, and {fieldgroup 2} with all fields in group 2. You can also pass a layout name: {field 3,mylayout}. This is handy for one-off placement, but editors must remember to add the code in every article, which does not scale on a site with hundreds of items.
3. A template override
Overrides put each field at a fixed spot in the article layout for every article, with your own HTML and CSS classes. This is the method for a site design where custom fields are part of the page structure: a byline, a spec table, a badge. The rest of this guide focuses on it.
Step 1: Prepare the fields
Go to Content → Fields and create the fields if you have not already. For each field you want to place yourself:
Open the field and check the Name value on the General tab. This is the machine name (for example book-author) that you will use in code. Joomla builds it from the title if you leave it empty, so look at what it actually saved.
Switch to the Options tab and set Automatic Display to Do not automatically display.
Save & Close.
If you skip the second step, the field will appear twice: once in its automatic position and once from your override. If you are new to fields, our older guide on adding extra fields to Joomla articles covers the field creation screen; the interface moved a little since Joomla 3, but the concepts are the same.
Step 2: Create the article override
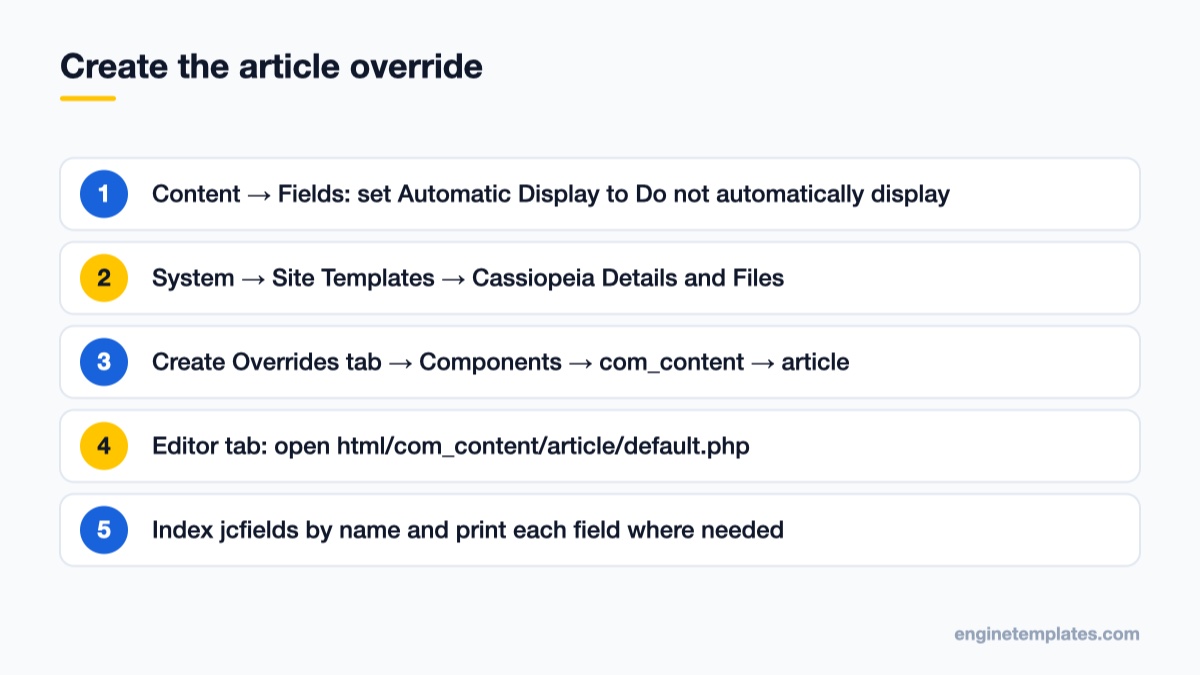
Joomla copies the core article layout into your template so updates do not overwrite it.
Joomla’s template manager creates the override file for you, copying the core layout into your template’s html folder:
Go to System → Site Templates.
Click Cassiopeia Details and Files (or the “Details and Files” link of your own template).
Open the Create Overrides tab.
Under Components, expand com_content and click article.
Joomla confirms the override was created. Back on the Editor tab, open html/com_content/article/default.php.
The file now lives at templates/cassiopeia/html/com_content/article/default.php. Joomla will use it instead of components/com_content/tmpl/article/default.php, and core updates will not overwrite it. If you work with a child template, create the override inside the child so the parent template can still be updated safely. For a refresher on how Joomla pieces layouts together, see The Joomla Layout Explained.
Step 3: Index the fields by name
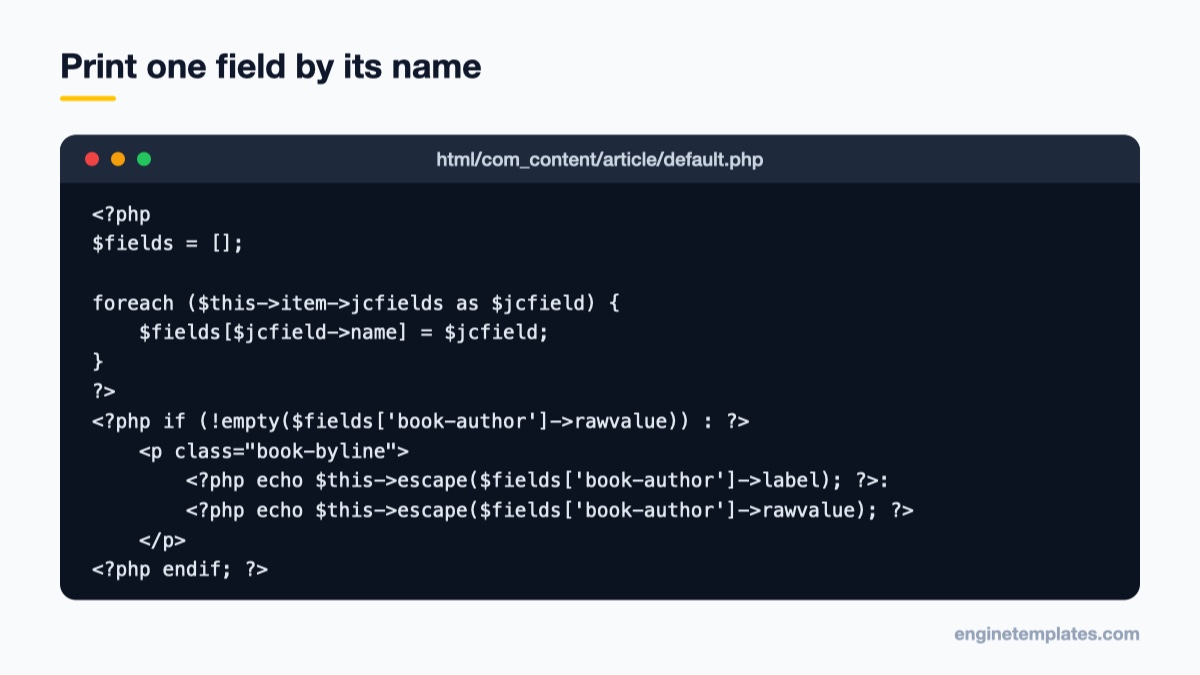
The jcfields array is keyed by field ID, which changes between sites (your staging site may have book-author as field 4 and production as field 7). Indexing by name is far more robust. Near the top of the override, after the existing use statements and the defined('_JEXEC') or die; line, add:
The official documentation shows the same idea by writing into $this->item->jcFields; a local $fields variable does the same job and keeps the item object untouched.
Step 4: Print each field where you need it
Index jcfields by name once, then output any field with an empty check and escaping.
Now find the spot in default.php where the field belongs. For a byline under the title, look for the block that prints the page heading and the afterDisplayTitle event, and add your markup just after it:
rawvalue vs value.rawvalue is what was saved in the database. value is the rendered output after the field plugin has formatted it (a List field prints the option text, a Media field prints an <img> tag, a URL field prints a link). Use rawvalue when you want full control of the HTML and escape it yourself; use value when you want Joomla’s formatting.
Always check for empty values. Not every article fills in every field. The !empty() check prevents empty paragraphs and PHP warnings when a field is missing.
Escape raw text.$this->escape() runs the value through htmlspecialchars, so a stray < in an editor’s input cannot break the layout. Do not escape value for fields that intentionally output HTML (Editor, Media, URL).
Multiple values. Checkboxes and multi-select List fields can return an array in rawvalue. In that case loop over it, or use value, which Joomla already joins into a string.
Using Joomla’s own field layout
If you want the standard Joomla markup (label, value and the classes set in the field’s options) but in your own position, render a single field through the field layout instead of building HTML yourself. Add this use statement at the top of the file:
use Joomla\Component\Fields\Administrator\Helper\FieldsHelper;
Then print the rating field in, say, the article info block:
This respects the Label, Show Label and class settings an administrator configures under Content → Fields → (field) → Options, which is useful when a non-developer will maintain the site.
A spec table from several fields
For product-style content (books, courses, properties), a small table is clearer than a list of paragraphs. Loop over the fields you want, in the order you want:
Because the order comes from the $specs array, you can reorder rows without touching the field ordering in the backend.
Step 5: Show fields in category blog and list views
The article override only affects the single article page. Category blog and featured views use their own layouts. To show the author under each intro in a category blog, create a second override from Create Overrides → Components → com_content → category. Joomla copies several files; the one that prints each item is html/com_content/category/blog_item.php. Inside it, $this->item refers to the current article in the loop and also carries jcfields, so the same name-indexing code works there. The featured view (home page) has its own featured/default_item.php, created from the featured entry in the same list.
Keep blog listings light. A byline or a single badge helps visitors scan; a full spec table on every intro usually makes the page noisy and slower.
Optional: override the field layout itself
Sometimes you are happy with the automatic positions and only want different markup, for example a <span> instead of a <div>, or an icon before the label. In that case override the field layout rather than the article:
In Create Overrides, open Layouts → com_fields and click field. Joomla copies the layout to html/layouts/com_fields/field/render.php.
Edit that file. It now controls how every single field is printed site-wide.
To change only some fields, rename the copy (for example to badge.php) instead of editing render.php, then choose badge in the Layout dropdown on the field’s Options tab.
The named-layout approach is the safest: other fields keep the core output, and you can switch a field back to the default layout from the backend at any time.
Styling the output
Put the CSS for your new classes in the template’s user stylesheet rather than in the override. In Cassiopeia, create media/templates/site/cassiopeia/css/user.css (the template loads it automatically when it exists) and add rules for .book-byline and .book-specs. Many commercial templates have a custom CSS box in their template style settings that does the same job. Keeping PHP for structure and CSS for appearance means a designer can restyle fields without opening a PHP file.
Common mistakes and how to fix them
The field shows twice. Automatic Display is still on. Set it to “Do not automatically display” for every field you print from the override.
Nothing appears. Check the field name with a quick temporary debug line, <?php echo implode(', ', array_keys($fields)); ?>, then remove it. Also confirm the field is published, assigned to the article’s category (or All) and that the viewing user’s access level can see it.
The override is ignored. The article may use a different template style (check the menu item’s template style assignment), or you edited the parent while a child template is active.
White screen after saving. A missing ; or endif breaks the whole page. Turn on error reporting under System → Global Configuration → Server on a staging copy, or read the server log as explained in How to Read PHP Error Logs.
Override breaks after a Joomla update. Core layouts change occasionally. After updating, open System → Site Templates; Joomla flags overrides whose core file changed so you can compare them. Our Joomla update guide covers a safe update routine.
Templates that suit field-driven content
Custom fields shine on sites where every article shares the same structure. A book shop or review site is the classic case, and ET Probook gives you a clean book-focused layout where an author byline and ISBN table fit naturally. For a news or review magazine, ET Ganews is a free Joomla template whose article pages have room for a rating box or a platform badge built from fields. You can browse more options in the free Joomla templates collection.
Wrap-up
To recap: set the fields to “Do not automatically display”, create an article override from System → Site Templates, index jcfields by name, and print each field with an empty check and proper escaping, or through FieldsHelper::render() when you want Joomla’s own markup. Repeat for blog_item.php if the data should appear in category listings, and keep styling in user.css.
Your next step: pick one field on your site that currently sits in the automatic list, move it into a meaningful spot with the code above, and test it on a staging copy before going live. For the full reference, see the official Joomla guide to custom field overrides and the Joomla documentation on field overrides, which still apply to Joomla 5 and 6 apart from the namespaced FieldsHelper class.
We're a Digital Team from EngineTemplate with 5 content experts. Our team has 5 years exp in open source Joomla and WordPress, we make daily blogs and build useful resources for everyone who is having issues with open source while using it.
 ET Digital Team