You want a separate section for portfolio projects, team members, case studies or events, but stuffing them into regular blog posts with a category makes the admin messy and the URLs confusing. A custom post type fixes that: its own menu in the dashboard, its own URL base and its own templates. You do not need a heavy plugin for it either. About 40 lines of PHP in a small site plugin will do the job, and that code keeps working when you switch themes.
This tutorial walks through registering a “Projects” post type by hand. You will make it work in the block editor, give it clean URLs, flush the rewrite rules properly and build single and archive templates for both classic and block themes. Every function and argument used here is documented in the WordPress Developer Resources.
What a custom post type is (and why it belongs in a plugin)
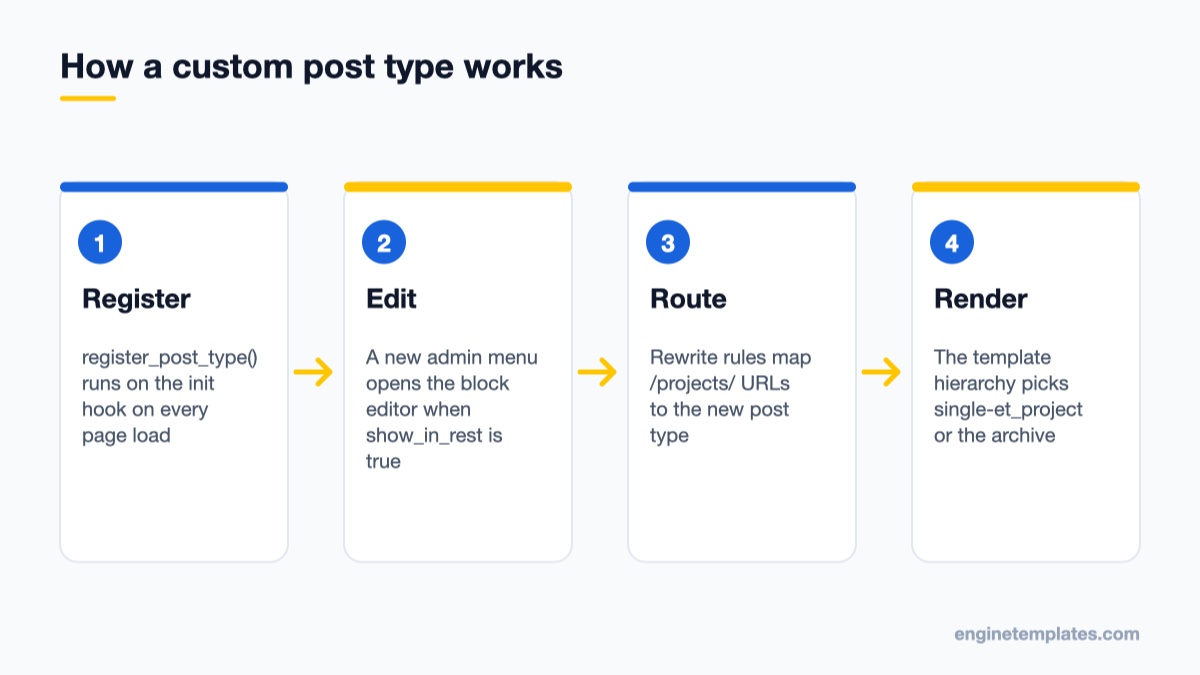
Registration runs on every request and tells WordPress how to store, edit and display the new content.
WordPress stores posts, pages, attachments, menu items and even block templates in the same database table, wp_posts. A post type is the label in the post_type column that tells them apart. When you call register_post_type(), you add a new label and tell WordPress how to treat it: whether it is public, whether it has an archive, which editor features it supports and what its URLs look like.
The official Plugin Handbook recommends registering post types in a plugin rather than in a theme. The reason is practical. If the code lives in your theme’s functions.php and you later switch themes, the post type disappears from the dashboard. Your projects stay in the database, but nobody can see or edit them until the code comes back. A tiny site-specific plugin keeps the content independent of the design layer.
There are a few naming rules to respect before you write any code:
20 characters maximum. The post_type column is a VARCHAR(20), and longer keys return a WP_Error.
Lowercase letters, numbers, dashes and underscores only, because the key is passed through sanitize_key().
Add a short prefix such as et_project rather than a generic project, so a future plugin with the same idea does not collide with yours.
Avoid reserved names: post, page, attachment, revision, nav_menu_item, wp_block, wp_template and the other core types, plus action, author, order and theme. Never start a key with wp_.
Step 1: Create a small site plugin
Connect to your site with SFTP or your host’s file manager and open wp-content/plugins/. Create a folder called et-projects and inside it a file called et-projects.php. The only header field WordPress requires is Plugin Name, but a description and version make the plugin easier to recognise later:
<?php
/**
 * Plugin Name: ET Projects
 * Description: Registers the Projects custom post type.
 * Version:     1.0.0
 * Requires at least: 6.0
 */

if ( ! defined( 'ABSPATH' ) ) {
	exit;
}
The ABSPATH check stops anyone from running the file directly through its URL. Save the file, but do not activate the plugin yet. Activation should happen after the registration and the rewrite flush are in place, otherwise the new URLs will return 404 errors until you flush them by hand.
If your host lets you edit files only through the dashboard, consider doing this work over SFTP instead. Many site owners turn the built-in editors off for security reasons, as explained in our guide on disabling the theme and plugin editor, and a typo in a live PHP file is much easier to undo when you have the file open locally.
Step 2: Register the post type on the init hook
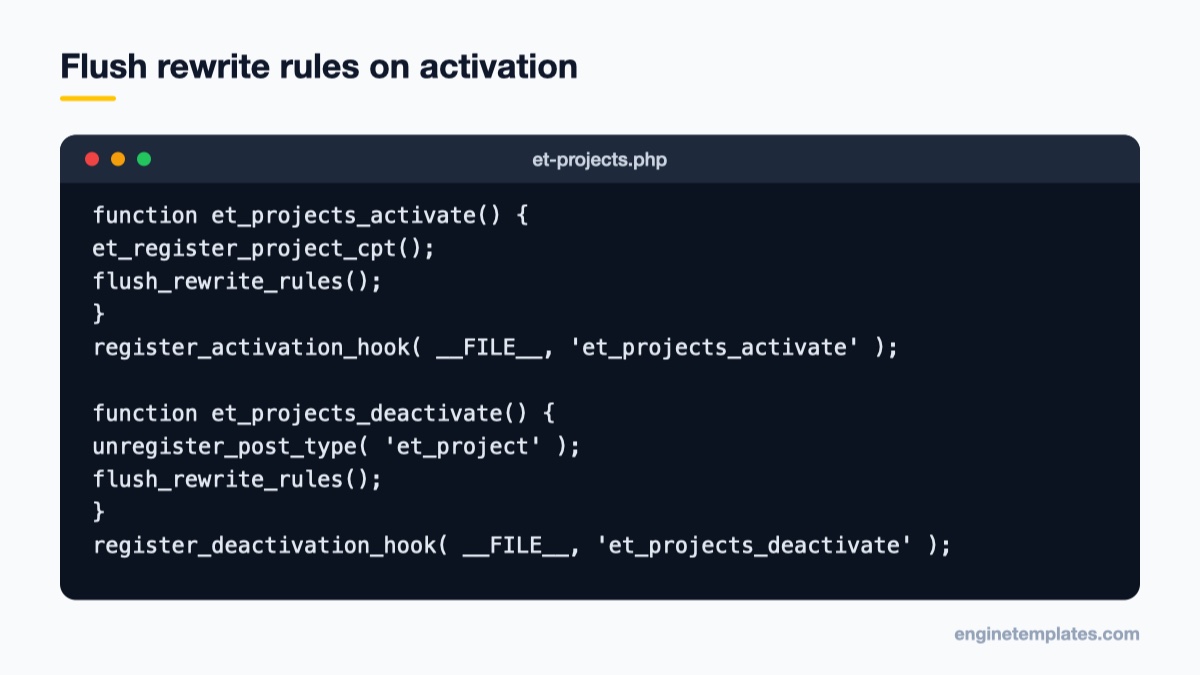
Register first, then flush; unregister first, then flush on deactivation.
Post types must be registered on the init action, every time WordPress loads. Registration is not stored in the database; it is a set of instructions that runs on each request. Add this below the header:
Text in the admin menu, buttons and screens. Without it you would see “Add New Post” on your projects screen.
public
false
Turns on the admin UI, front-end queries, search and menu availability in one go.
has_archive
false
Creates a listing page at /projects/. Needs rewrites enabled.
show_in_rest
false
Exposes the type to the REST API, which the block editor needs. Without it you get the classic editor.
menu_icon
Posts icon
Any Dashicons class, an image URL or a base64 SVG.
supports
title, editor
Editor features: thumbnail adds the featured image box, excerpt the excerpt panel.
rewrite
Post type key
Sets the URL base. Without it URLs would use /et_project/.
The most common surprise is show_in_rest. Leave it out and your new post type opens in the old classic editor, with no blocks and no patterns. If you want the block editor, which you almost certainly do on a modern site, set it to true.
Keep the key (et_project) and the URL slug (projects) separate in your head. The key is the internal name stored with every project in the database, and changing it later means migrating content. The slug is only the URL base, and you can change it whenever you like as long as you flush the rewrite rules and add redirects for old links.
Step 3: Flush rewrite rules on activation
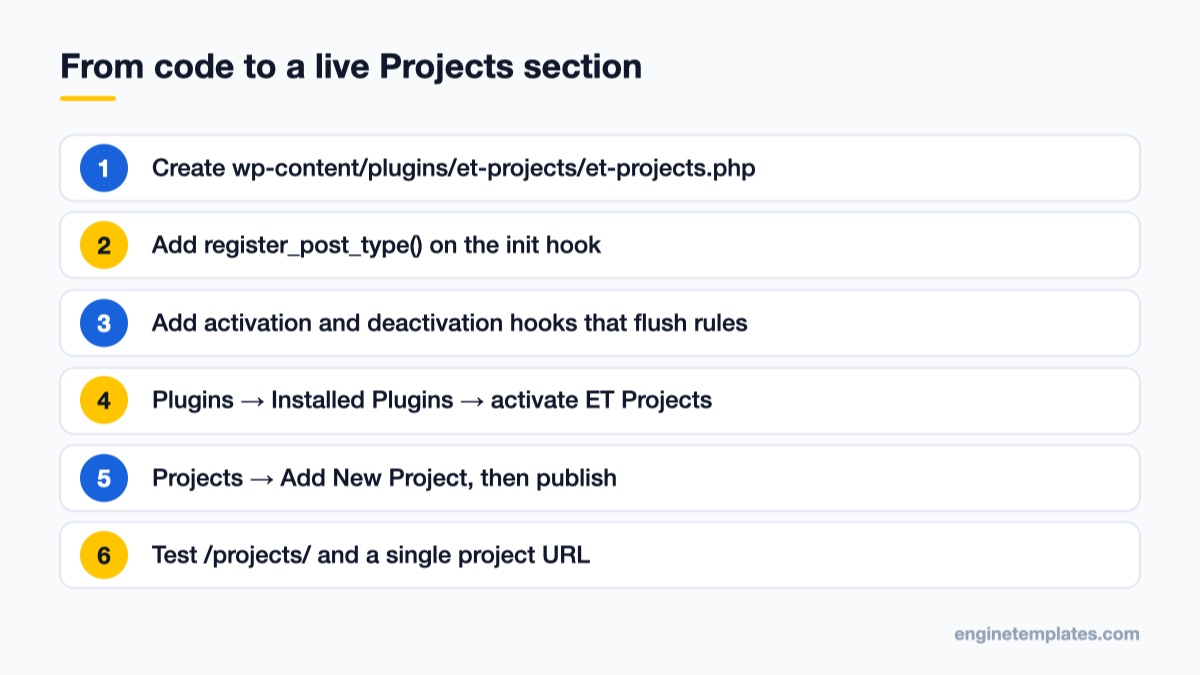
The full procedure, from an empty plugin folder to working project URLs.
WordPress keeps its URL rules in a cached option. A new post type adds new rules, but the cache does not know about them until it is rebuilt, which is why a fresh custom post type often shows “Page not found” on every single item. The fix described in the activation and deactivation hooks chapter is to rebuild the rules once, when the plugin is activated, and clean them up when it is deactivated:
The order matters. On activation, the post type is registered first so its rules exist in memory, then the cache is rebuilt. On deactivation, it is unregistered first so its rules are dropped, then the cache is rebuilt without them.
Do not call flush_rewrite_rules() on the init hook. Flushing is an expensive operation, and running it on every page load slows the whole site down. If you ever change the slug later, simply open Settings → Permalinks in the dashboard and click Save Changes without editing anything; saving that screen rebuilds the rules too.
Now go to Plugins → Installed Plugins and activate ET Projects. A Projects menu item with a portfolio icon appears in the sidebar.
Step 4: Add your first project and check the URLs
Open Projects → Add New Project. You should see the block editor with a title field, the featured image panel and the excerpt panel in the sidebar, exactly the features listed in supports. Add a title, a few paragraphs, a featured image and publish.
Then test two URLs:
The single project, for example https://example.com/projects/brand-refresh/.
The archive at https://example.com/projects/, which lists every published project.
If either returns a 404, revisit Step 3 and save the Permalinks screen once. If the archive works but shows the wrong layout, that is a template question, covered next.
You can also add projects to navigation now. In a classic theme, open Appearance → Menus; if the Projects box is missing, open Screen Options at the top of the screen and tick it. In a block theme, edit the Navigation block in the Site Editor and add a custom link to /projects/.
Step 5: Give projects their own templates
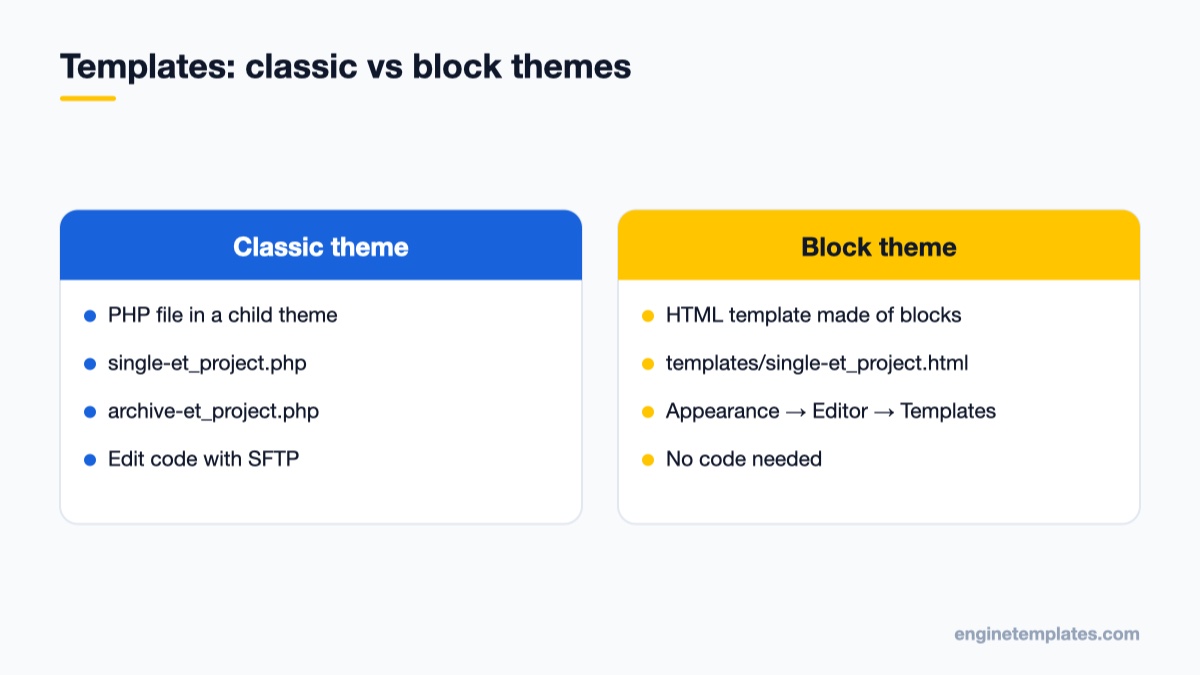
Both theme types follow the same hierarchy, only the file format and editing tool differ.
Out of the box, projects use your theme’s generic single and archive templates. That works, but a portfolio usually deserves a different layout: a wide hero image on single projects and a grid on the archive. According to the template hierarchy, WordPress looks for these files in order:
Single project:single-et_project-{slug}.php, then single-et_project.php, then single.php, singular.php and index.php.
Archive:archive-et_project.php, then archive.php, then index.php.
Note that the file names use the post type key, not the URL slug. A file called single-projects.php will never be picked up.
Classic themes
Work in a child theme so an update to the parent theme does not wipe your files. Copy the parent’s single.php into the child theme, rename it single-et_project.php and adjust the markup. A minimal loop that prints the featured image and the content looks like this:
Block themes follow the same hierarchy with HTML files instead of PHP. You do not have to touch files at all: open Appearance → Editor → Templates, add a new template and choose the single item template for Projects, or the archive template for Projects. Design it with blocks, save, and the Site Editor stores it for you. If you prefer to ship the template with a theme, the equivalent file is templates/single-et_project.html. Colours and fonts on these templates still come from your global styles, which we covered in customizing colors and fonts with theme.json.
If you are building a portfolio from scratch, a theme designed for showcasing work saves a lot of layout time. ET Poren is a free, responsive portfolio theme for WordPress with gallery-style layouts that suit a Projects archive, and its one-page sibling ET Poren Onepage works well when you want projects to feed a single landing page.
Optional extras worth adding
A few more arguments are useful once the basics work:
'menu_position' => 5 places Projects directly below Posts in the admin sidebar (20 would put it below Pages).
'template' => array( array( 'core/image' ), array( 'core/paragraph' ) ) pre-fills every new project with an image block and a paragraph, so editors start from a consistent layout. Add 'template_lock' => 'all' if they must not change the structure.
'supports' can include 'custom-fields' if you want client name or year values available through the REST API and the editor’s custom fields panel.
'hierarchical' => true lets projects have parents, like pages. Add 'page-attributes' to supports so the parent selector appears.
To group projects by service or industry, register a custom taxonomy with register_taxonomy() on the same init hook and pass 'et_project' as its object type. Remember 'show_in_rest' => true there too, or the taxonomy panel will not appear in the block editor.
Common mistakes and how to fix them
Every project returns 404. The rewrite rules were never rebuilt. Go to Settings → Permalinks and click Save Changes, or deactivate and reactivate the plugin.
The classic editor opens instead of the block editor.show_in_rest is missing or false.
No featured image panel. Add 'thumbnail' to supports. Your theme must also declare add_theme_support( 'post-thumbnails' ); almost all current themes do.
The archive page is a 404 but single items work.has_archive is missing, or a regular page already uses the slug projects. Rename one of them and save permalinks.
Your template file is ignored. Check that the file name uses the key (et_project), not the slug, and that it lives in the active theme or child theme.
White screen after saving the plugin. Usually a missing semicolon or bracket. Our guide to reading PHP error logs shows how to find the exact line, and you can rename the plugin folder over SFTP to disable it instantly.
The post type vanished after a theme change. It was registered in functions.php. Move the code into a plugin as shown above; the content is still in the database and reappears as soon as the registration runs again.
Plugin or code: which should you choose?
Hand-written code is lean, has no settings screen to break and is easy to keep under version control. A plugin with a graphical builder is friendlier if non-developers need to add new post types or many custom fields regularly. If that sounds like your team, our older roundup of custom post type plugins lists the main options. For one or two well-defined content types, such as projects, services or team members, the 40 lines in this tutorial are usually all you need.
Wrapping up
You now have a self-contained plugin that registers a Projects post type with the block editor, featured images, an archive at /projects/, clean URLs and correct rewrite flushing, plus single and archive templates in either a classic or a block theme. The next step is to repeat the pattern for any other content that does not fit in posts or pages, and to add a taxonomy so visitors can filter your projects. Keep each post type’s key short and prefixed, keep the code in a plugin, and your content will survive every redesign.
Looking for a theme to present your new content type? Browse our free WordPress themes.
We're a Digital Team from EngineTemplate with 5 content experts. Our team has 5 years exp in open source Joomla and WordPress, we make daily blogs and build useful resources for everyone who is having issues with open source while using it.
 ET Digital Team