Do you want to improve the quality of your blog content? Setting a minimum word count for WordPress posts is a perfect way to ensure that all writers provide readers with valuable content. In this blog, we will give you 2 amazing solutions to handle this task. Read our blog now!
Why should you set a minimum word count for WordPress posts?
As you know, the quality of content is one of the most important factors that directly affect your website’s ranking. In addition, much research shows that longer content will have more chances to appear in search results pages than short content. Hence, if your website has multiple authors, you can need to set a minimum word count for WordPress posts to ensure that all authors deliver high-quality content to your readers.
In today’s blog, we will bring you 2 easy ways to set a minimum word count for WordPress posts. Now, let’s dive into our blog.
How to set a Minimum Word Count for WordPress Posts?
Method 1: Using a free plugin
The first method that we would like to recommend is using a free plugin to add a minimum word count for WordPress posts. Currently, there are plenty of free plugins that help you easily handle this problem. However, in this tutorial, we will guide you to use the PublishPress Checklists plugin. This tool will show a list of required tasks that you need to complete before publishing your posts including ensuring your posts have a minimum or a maximum number of words.
To use this tool, first of all, you need to install and activate the plugin. You can follow our quick instructions below to install it.
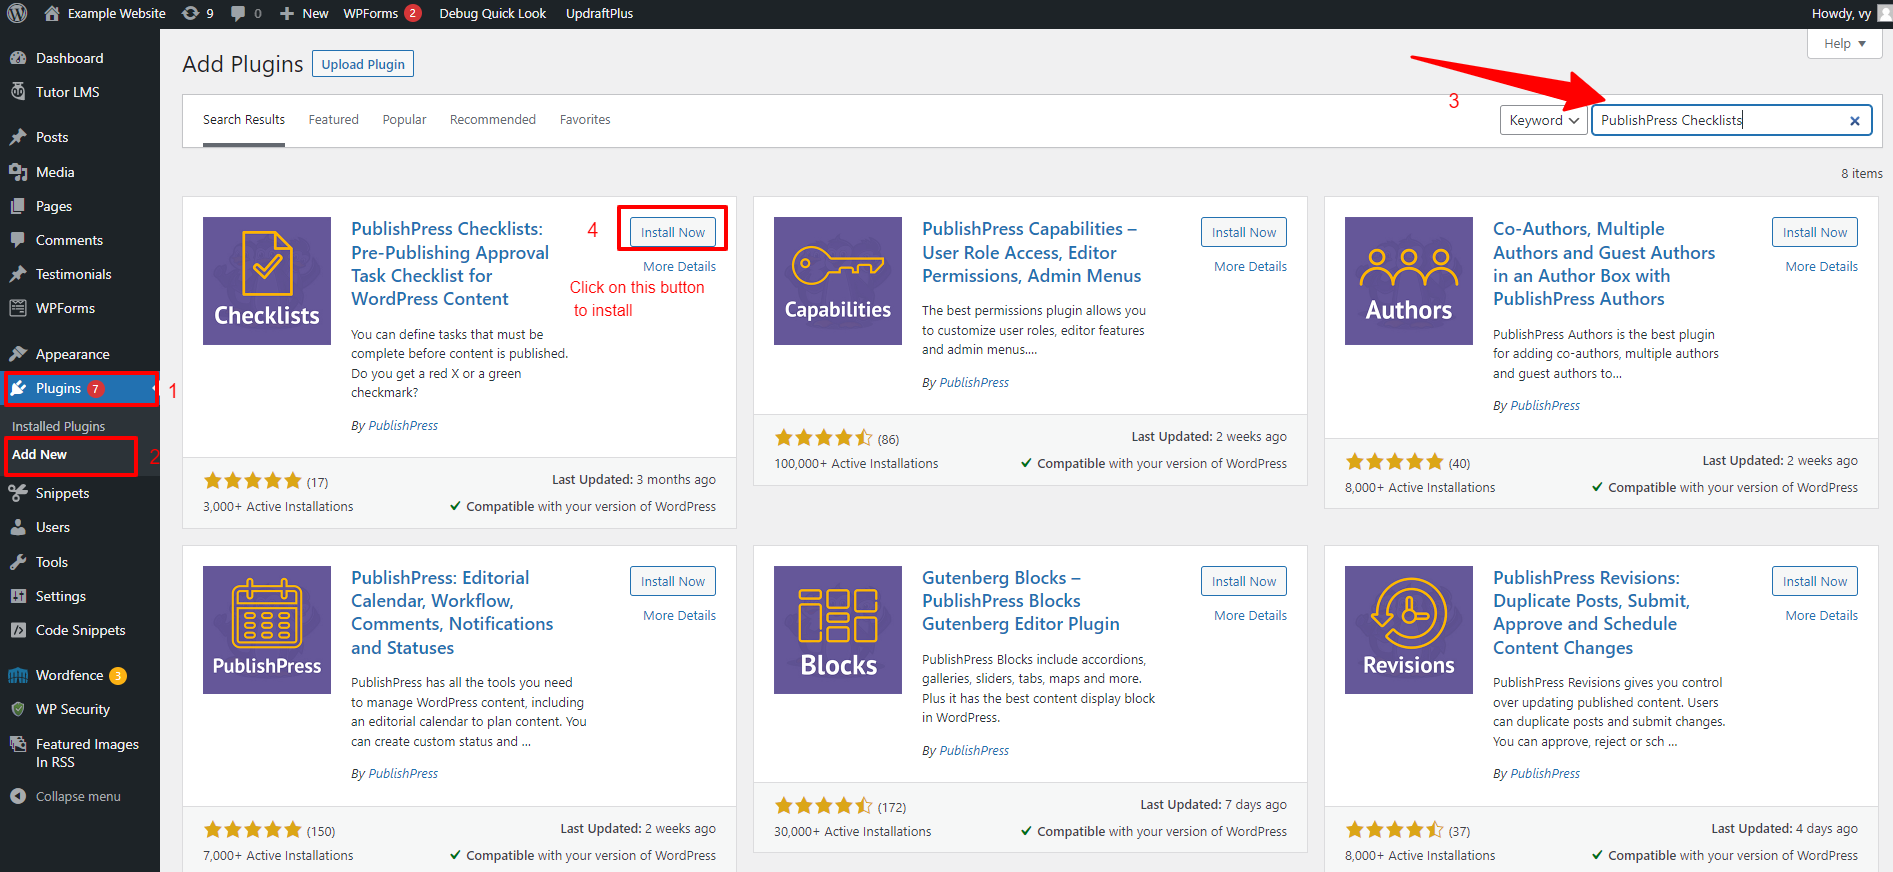
- Log into your WordPress dashboard
- Go to Plugins > Add New
- Let’s use the search bar to find the PublishPress Checklists plugin
- Finally, click on the Install Now and Activate button to activate it
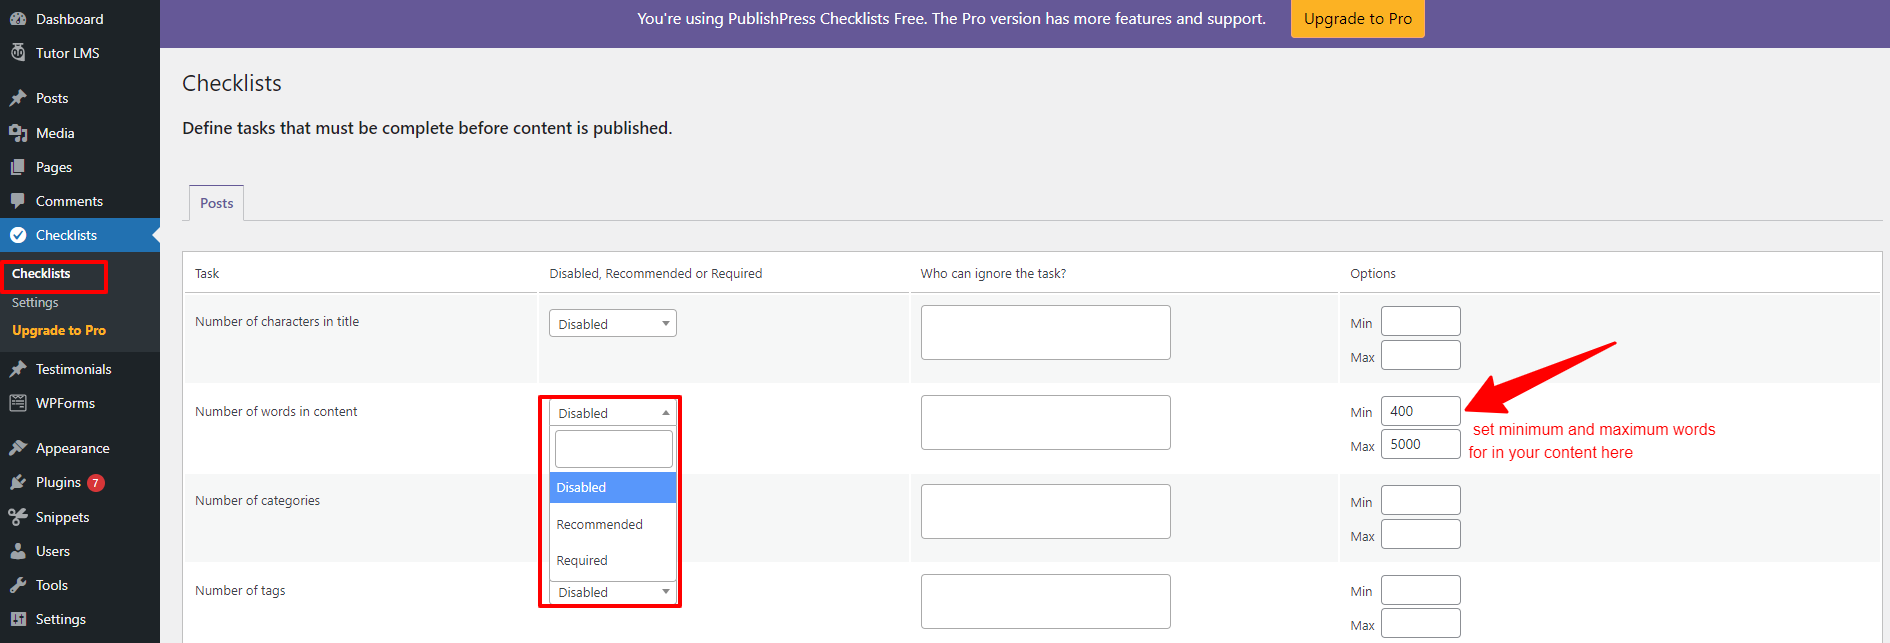
Once the plugin is activated. Now, you can go to the Checklists menu from your WordPress dashboard.
On the Checklists page, you can set minimum and maximum words for content at the “Number of words in content” option.
Additionally, you can choose to make the “Number of words in content” option to be disabled, recommended, or required task by clicking from the drop-down menu.
If you select the “Recommended” option, then authors can publish their posts without meeting the minimum word count. Therefore, you need to choose the “Required” option to ensure that the authors must complete the minimum number of words in their content before publishing them.
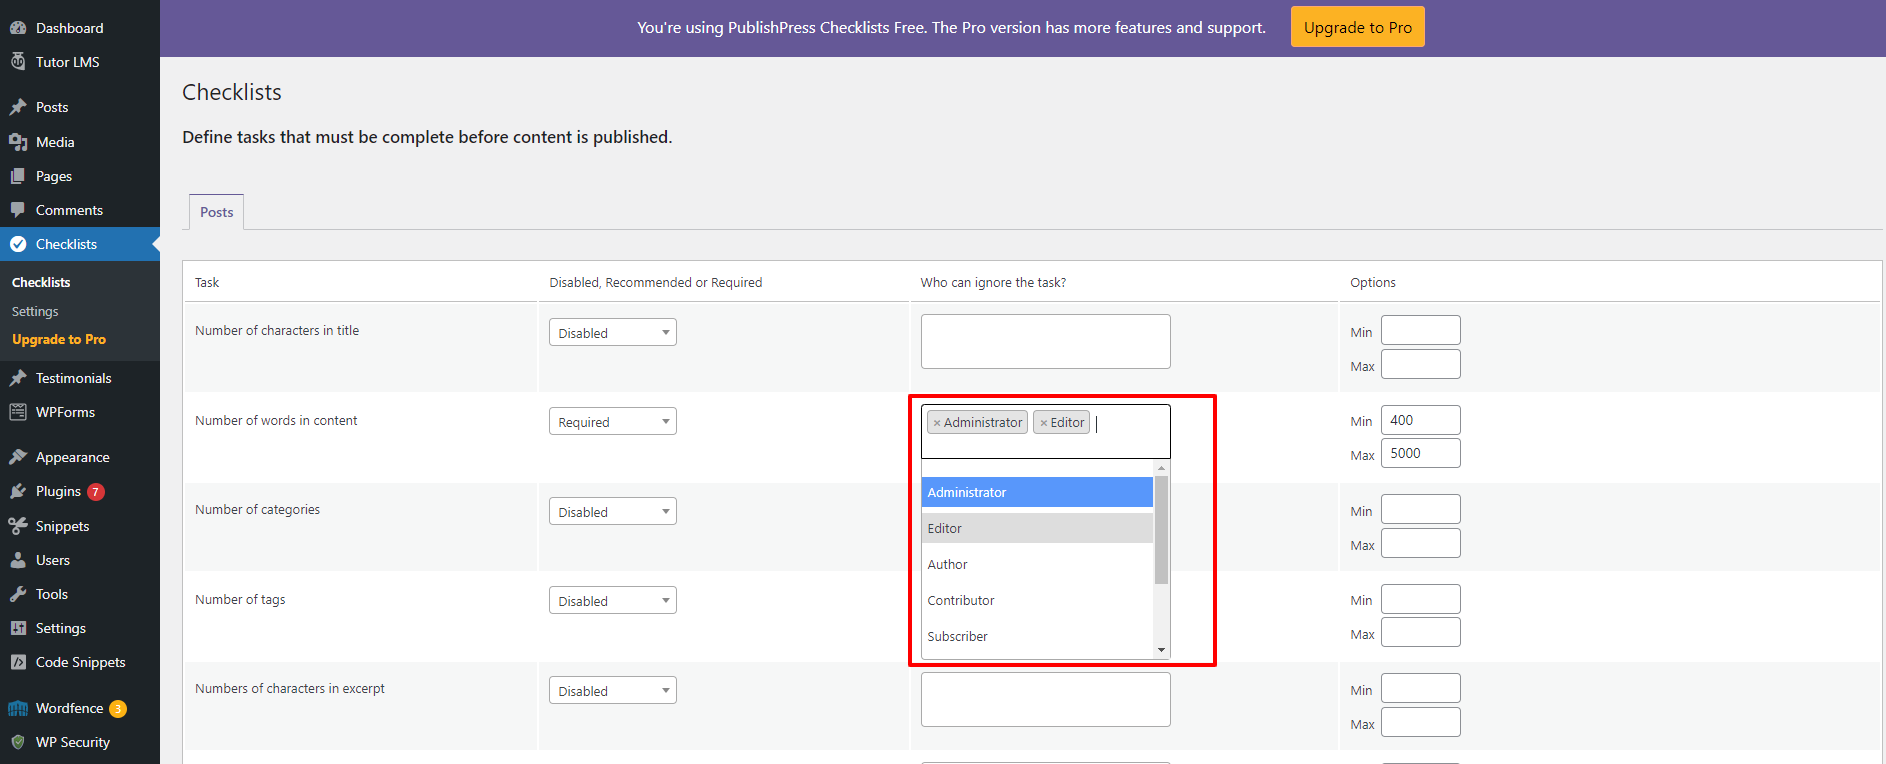
Additionally, this plugin also allows you to add user roles that don’t need to meet the word count you have set. To do so, simply click on the box under the “Who can ignore the task” column and add the user roles you want.
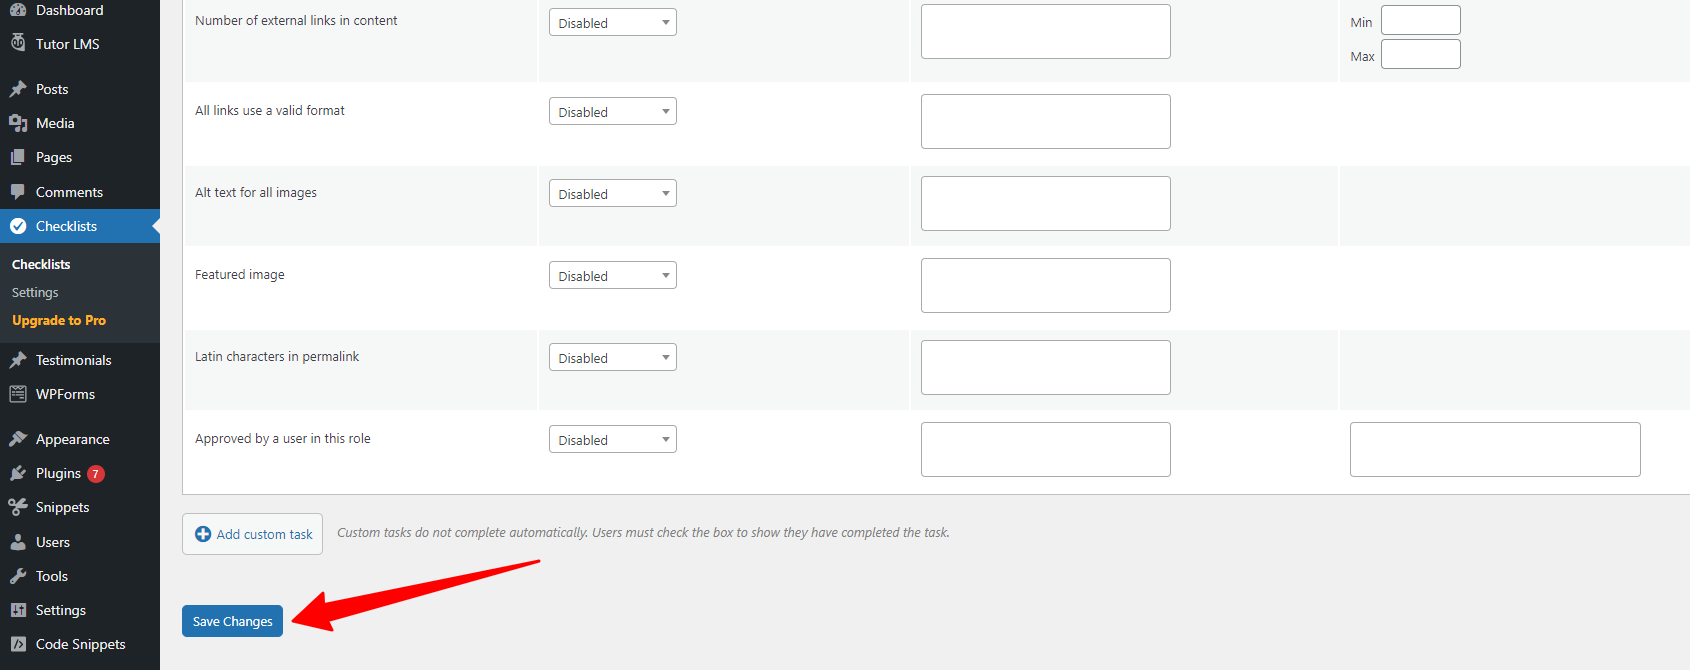
After you have set the minimum and maximum number of words that you want authors to complete. You need to scroll down the page and click on the “Save Changes” button.
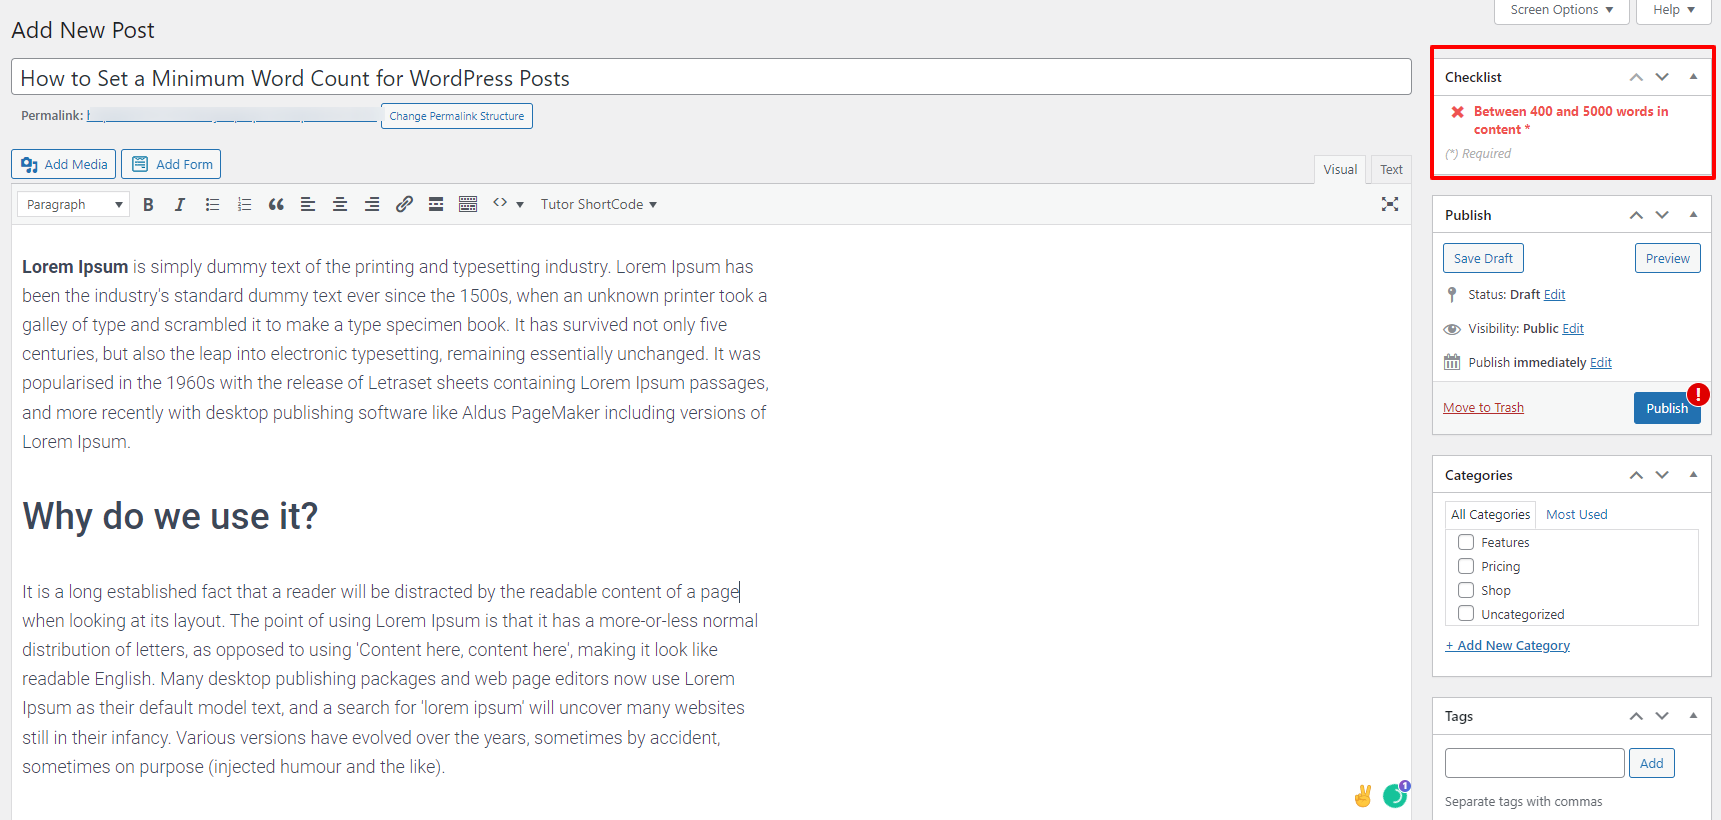
Now, you can get started creating a new post by navigating Posts > Add New. You will see a warning in the “Checklist” box on the right sidebar which displays that the number of words in your content is not enough for the required minimum word count. And of course, you are not able to publish your blog post.
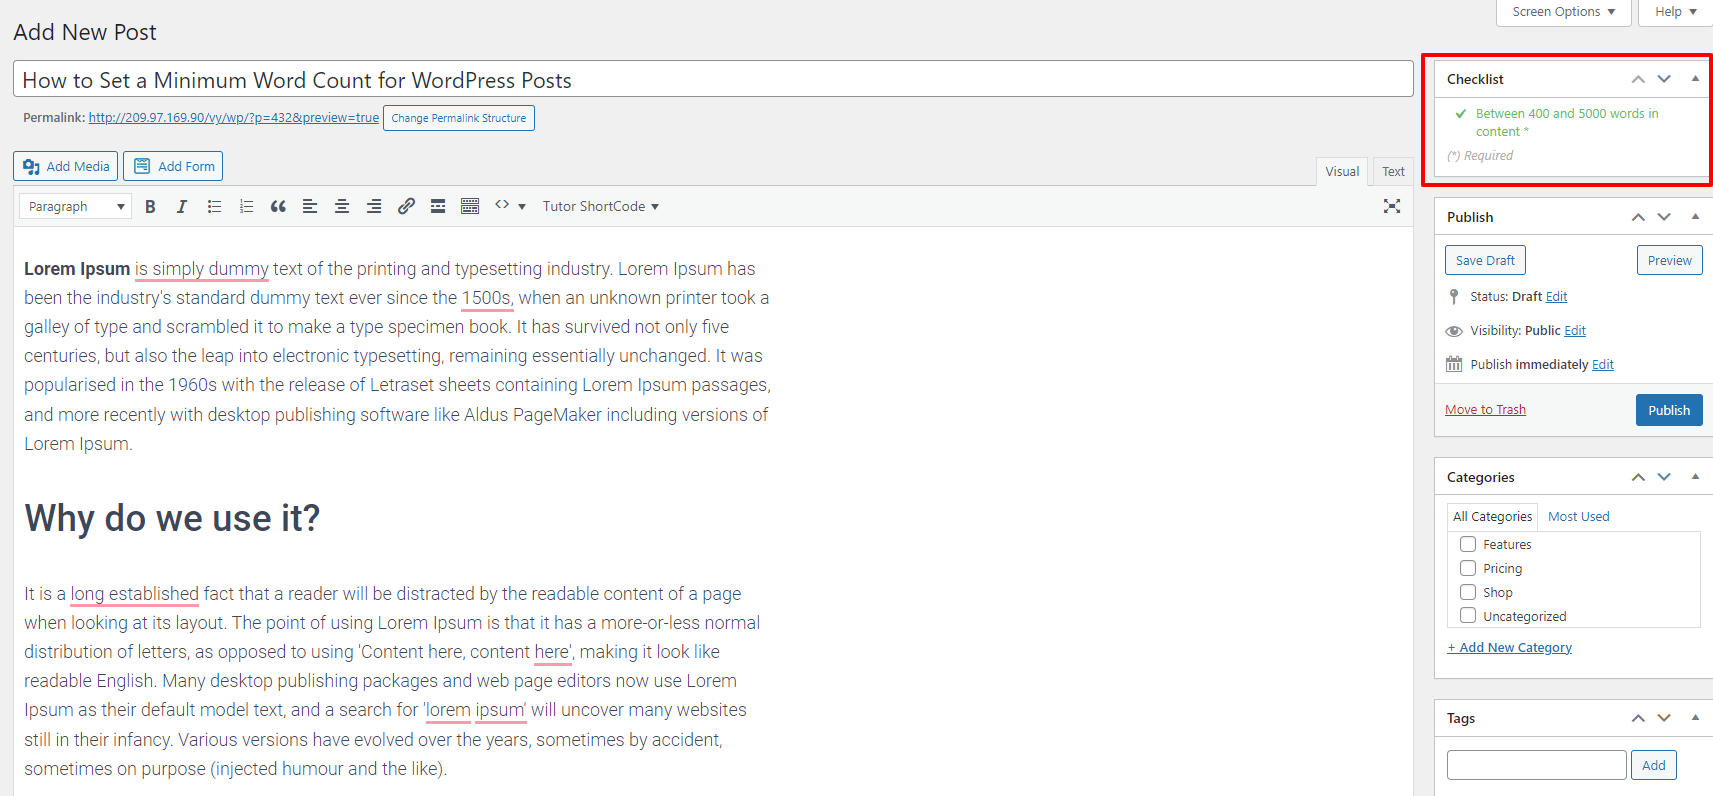
In contrast, once your content reaches the required minimum word count, the checklist task will display a green checkmark. Now, you can publish your blog post.
Method 2: Adding custom code
In addition to using PublishPress checklists to add a minimum word count for WordPress posts, you can also add a code snippet to the functions.php files in your WordPress theme to handle this task.
Nevertheless, this method may cause problems for your website if you have a tiny mistake by chance in the process of editing the functions.php files.
Alternatively, you can still add code snippets to your WordPress by using WPCode instead of editing your theme’s functions.php files. This method will help you easily add custom code without the risk of breaking your website.
Similarly, to use this method, you also need to install and activate the WPCode first. The process of installing this plugin is the same steps that we did in the first method.
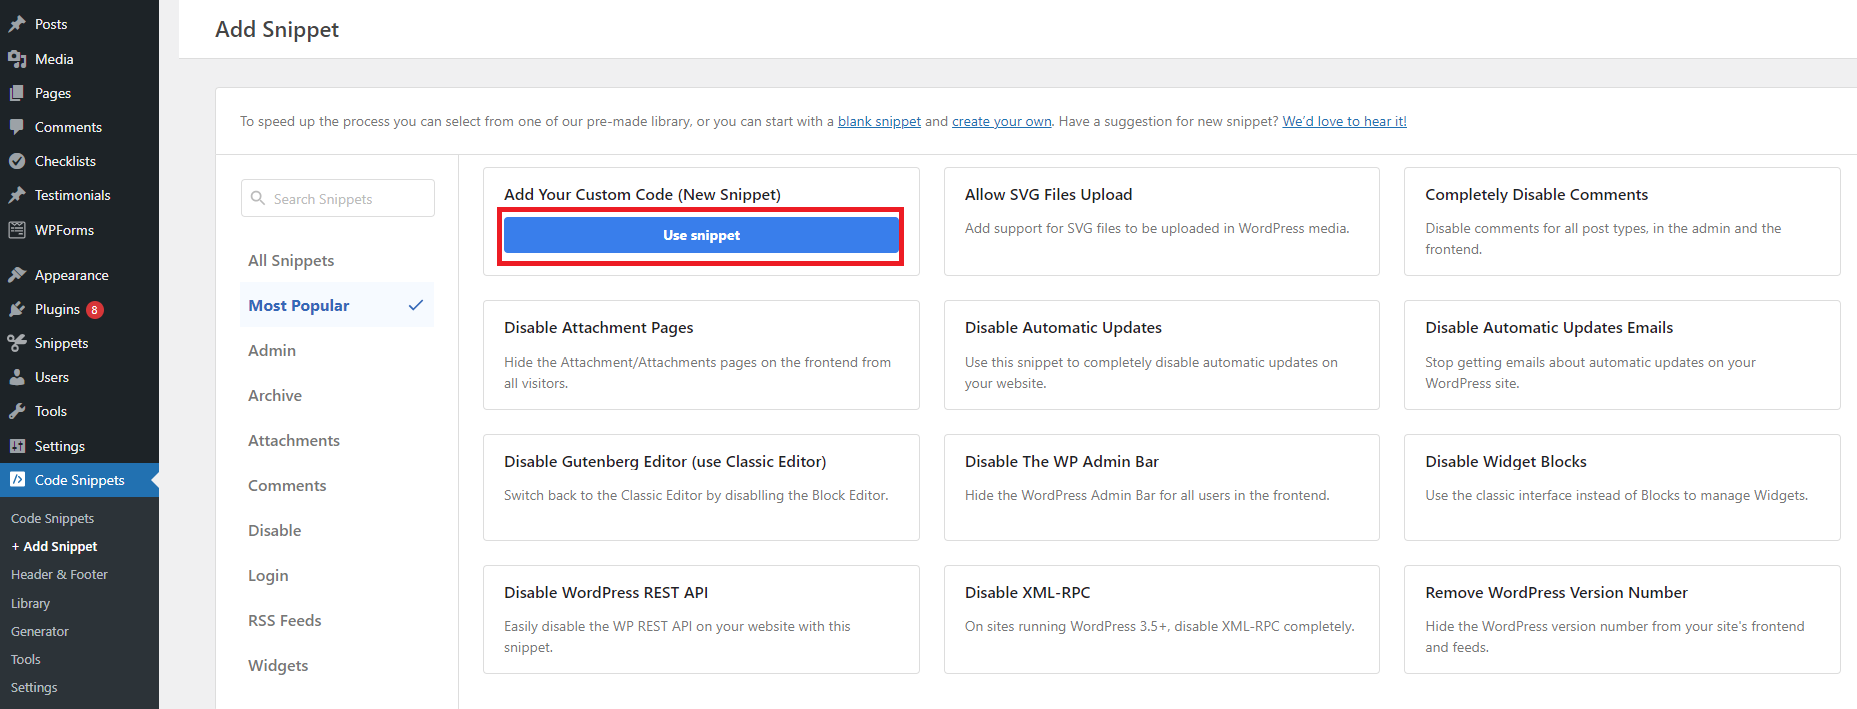
Upon activation, you go to Code Snippets > Add New from your WordPress admin panel.
Next, hover over the “Add your custom code (New Snippet)” option and click on the “Use snippet” button.
Now, you need to copy the following code and paste it into your new snippet under the “Code Preview” area. You can give your new snippet a title on the “Create Custom Snippet” page.
function minWord($content)

{

global $post;

$content = $post->post_content;

if (str_word_count($content) < 100 ) //set this to the minimum number of words

wp_die( __('Error: your post is below the minimum word count. It needs to be longer than 100 words.') );

}

add_action('publish_post', 'minWord');
You can customize the minimum number of words from 100 to the number you want and customize this number in the error warning.
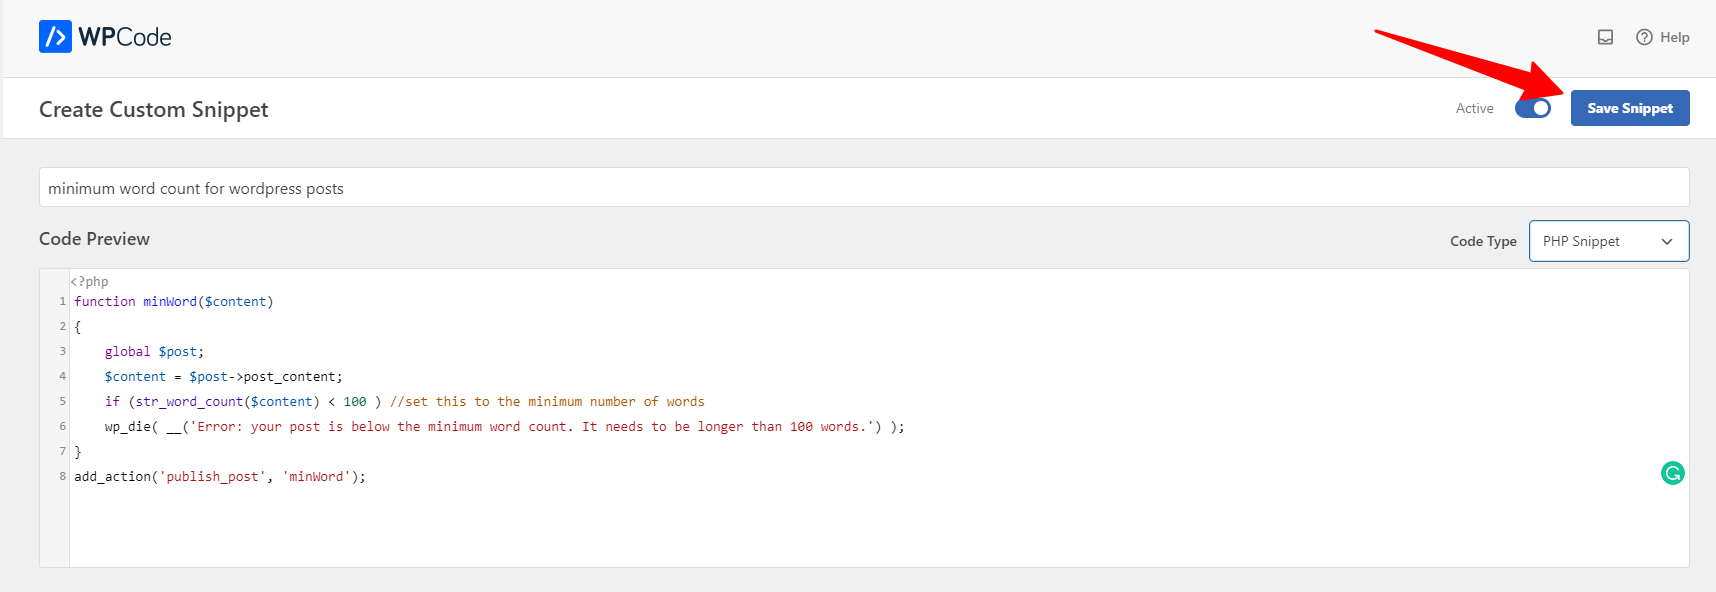
Next, you need to choose the “PHP Snippet” option from the dropdown menu on the right.
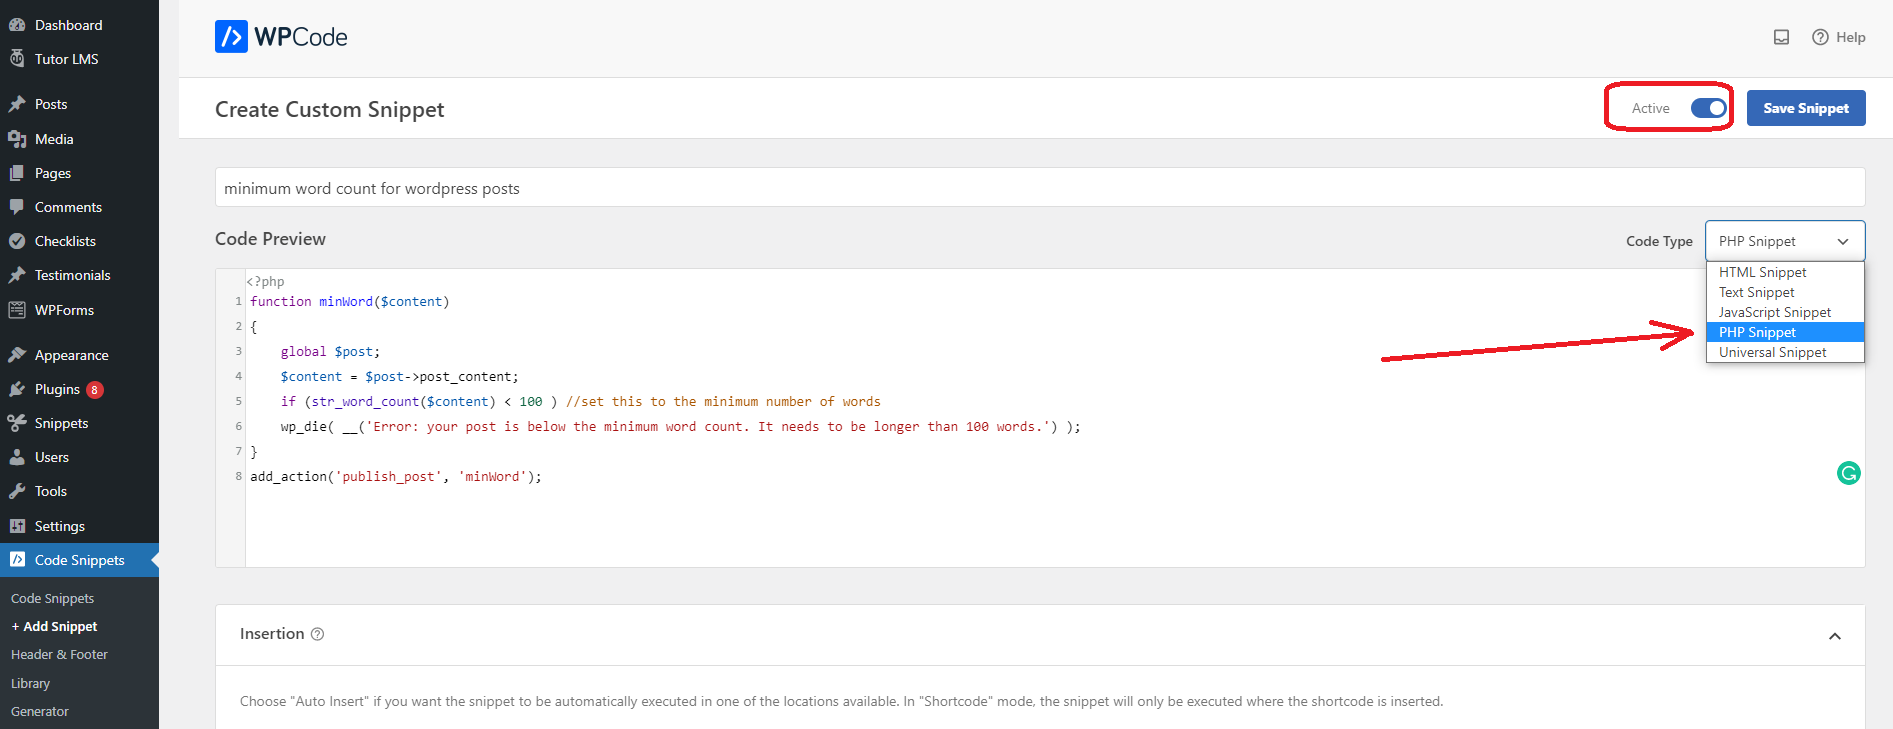
Let’s scroll down to the “Insertion” section and choose the “Auto insert‘ option. This method will help you automatically insert and implement the code for you.
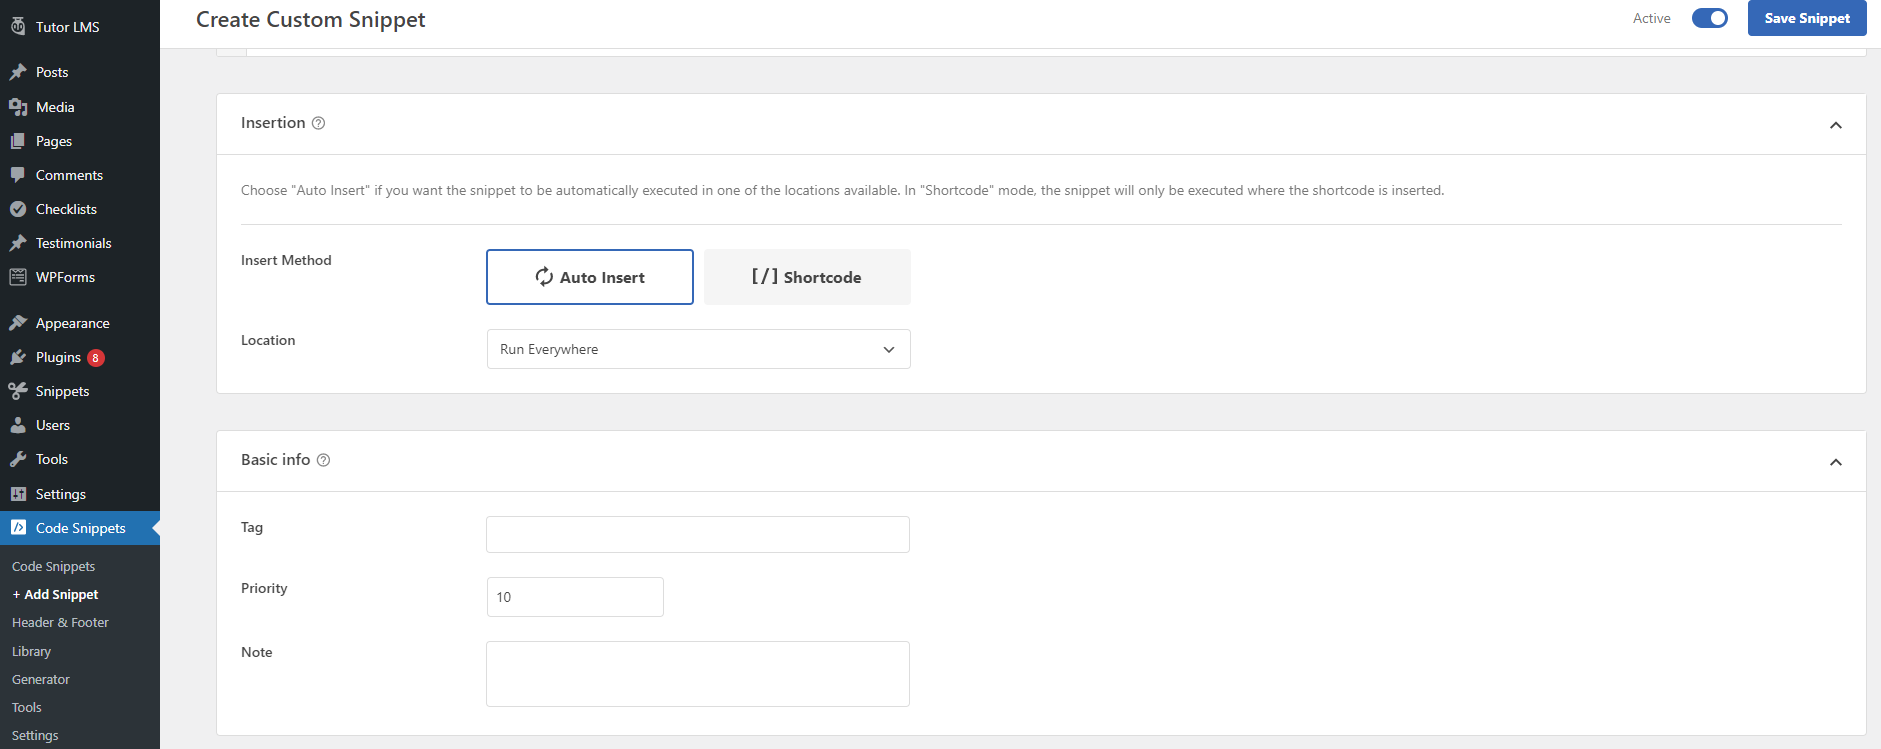
Then, you need to switch the toggle from “Inactive” to “Active“. and don’t forget to click on the “Save Snippet‘ button to save your changes.
Now, you can create a new post and publish it. If the number of words in your WordPress post doesn’t hit your goals, then you will get the publishing error as the screenshot below.

Summary
To sum up, setting a minimum word count for WordPress posts is a great method to ensure that all authors publish high-quality content. In addition, it also helps you ensure the quality of your blog and drive more traffic to your blog posts. Hopefully, our blog is useful for your website. If you are interested in our blog, don’t forget to leave a comment below.
By the way, we would like to introduce a collection of eye-catching, responsive, free WordPress Themes on our websites. They are completely compatible with many prevalent plugins and suitable for various topics. Let’s check them out.


