Description
You might want to configure several tax categories for your products by going to the Categories HikaShop menu.
– You might have a category food and a category electronics with the example above. Then, when you add or edit products, you can set a tax category for each.
– Click on the Manage rates button on the taxations rules screen, you can create tax rates. Ex: you can create a rate of 5% for food sales and a 20% rate for electronics.
– In addition, you can also create tax zones in the zones management screen, in which you will be able to group states or countries, in order to set a specific rule for all of them in one taxation rule instead of one per state or one per country.
– You will be able to manage taxation rules which will connect all those dots together. You will have to explain to the system which tax rate needs to be used for which tax category in which zone for which type of customer. Thanks to those rules, the system will then adapt the prices of products on your shop for each customer so that they pay the correct amount. If you set a rule for Texas (a state in the USA) to pay 5% on food and that you have a similar rule for the whole USA to pay 10%. If the customer is in Texas, he will pay only 5%, but if he is in the USA but not in Texas, he will pay 10%. If no rules match the current situation, no tax will be applied.
– In order to know what tax rate need to be applied in which circumstance we highly recommend you to seek advice to your local tax office.
– Finally, once you setup your tax rules, when you create/edit your products, you need to select the tax category which will be used for the calculation of taxes for your products.
Toolbar
![]()
- Manage tax categories : Click on this button, you’ll see a listing of tax categories and be able to create and edit tax categories. Tax categories can then be used in taxation rules.
- Manage rates : This button will bring you to the tax rates management where you will see a listing of tax rates and be able to create and edit tax rates. Tax rates can then be used in taxation rules in order to define the amount of tax to apply to the prices. You need to create at least one tax rate before creating a tax rule.
- New : Click this button to create a new taxation rule.
- Edit : Select a taxation rule and then click on this button to edit its information.
- Delete : Select taxation rules that you want to delete then click on this button in order to delete them.
- Help : This button enables you to turn ON/OFF the help section, this screen will appear or disappear.
- Control panel : Use this button to go back to the control panel.
Column Headers
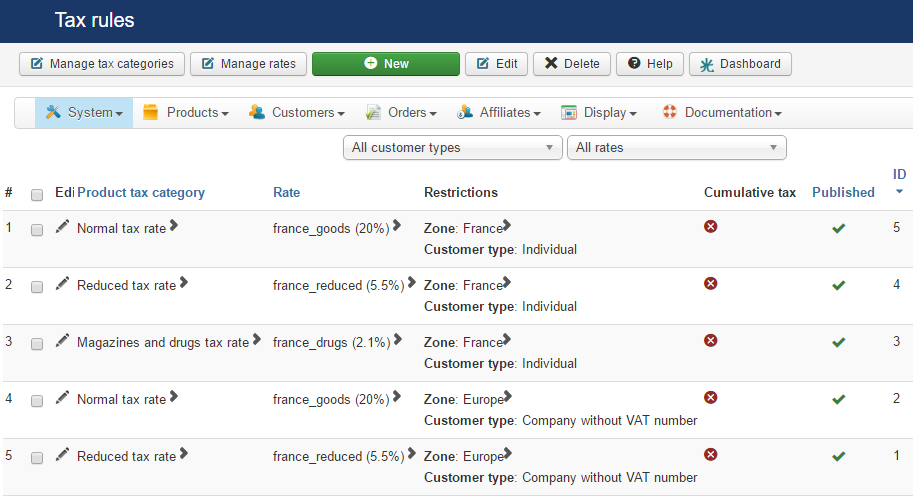
- Checkbox : Select one or more items. To select all items, check the box in the column heading.
- Zone : A zone limiting the rule to a certain geographic zone. Click on it to go to the edit screen of the zone.
- Tax category : The rule will only apply to a certain tax category. If you click on it, you will go to the edit screen of the tax category.
- Rate : If the rule applies to the situation (product in the tax category, customer in the zone and with the correct type), the rate of the rule will be applied to the product price(s).
- Customer type :You can limit the rule to only a certain type of customers.
- Published : If a taxation rule is published it means that it will be applied on prices based on the product tax category, the customer type and the customer zone.
- ID : This field indicates the ID of the taxation rule.
If you have any question about this post, don’t hesitate to leave a comment below. And don’t forget to share with your friends if you find it useful! Thanks!

